Register with us for competitions, online recipe book and chat


Sew a Lisa Stickley bolster: free sewing pattern
Cosy up in style - from 'Made at Home: a Guide to Simple Sewing' by Lisa Stickley
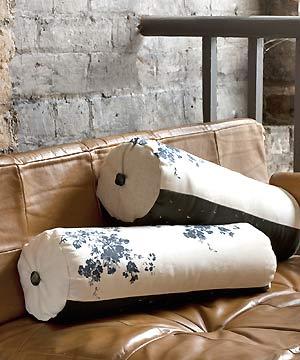
Traditionally used on the bed, the bolster is great for plumping up when reading and snuggling up to when sleeping. As well as providing extra support, for me, they are equally fabulous for dressing up a sofa, armchair, daybed or chaise longue!
You will need
• 1 piece of medium weight cotton or linen, 64cm x 49cm (when hand stitching the zip)
• or 2 pieces of medium weight cotton or linen, each 33cm x 46cm (when machine stitching the zip)
• 2 discs of cotton or linen, 21cm in diameter
• 2 buttons (mismatched vintage ones are good for this)
• 1 upholstery zip, 46cm long
• 1 feather-filled bolster, 46cm long by 20cm in diameter
Add the zip
When using a sewing machine, fitting a zip is much easier with two panels of fabric. I used two panels of contrasting fabric for the bolster pictured.
To fit the zip between two panels of fabric, fold a 1cm hem over to the wrong side along the length of one side on each piece. Press and pin. Change over to the zip foot on your machine. Starting with one panel, line the pressed edge of the panel up with the open end of the zip. I find this easier to machine without pinning in place and with the zip open by only a couple of centimetres. Depending on the type of zip foot you have on your machine, it is often easiest to stitch the panel to the zip with the fabric on the left of the zip, then turn the zip around to attach the second panel.
Machine the zip in place making sure to backstitch at the start and finish to secure the seam. Repeat this on the opposite side of the zip, this time machining the other panel in place. Make sure to line the panels up with each other, and the open end of the zip.If you choose to use a single panel of fabric the technique is the same, however I recommend fitting the zip by hand as keeping the excess fabric out of the way of the sewing machine needle is particularly tricky.
Join the main panels
If using two panels you will need to join them together. With right sides facing, place the long edges of the panels together so the raw edges meet. Pin and stitch with a 1cm seam allowance. Backstitch at the start and finish to fasten the seam. Press the seams open.
Fit the end panels
Prepare the main piece for fitting the end panels by making a round of 1cm cuts, 2cm apart, at each end. With the zip half open, pin the end discs in place. Stitch with a 1.5cm seam allowance. This is a little tricky so take your time: if you need to add a little pleat here and there to make it fit, then do.
Attach the buttons
Turn the cushion cover right side out. With tailor's chalk, mark the centre point at each end. Hand stitch the buttons in place, gathering the fabric in slightly to create a puckered effect. Finish with a double knot and wind the excess thread around the button.
Add the bolster
Stuff the cover with the feather bolster and zip up.
 This project is taken from 'Made at Home: a Guide to Simple Sewing' by Lisa Stickley (Quadrille, £16.99) Click here to buy the book for £12.99
You might also like...
See all kinds of cushions to sew


Post your comment
Join us here...


Click on a magazine title to see all its
online features and news

Stain buster
Our guide to removing smudges, spots, and other spills.
See more stain busting solutions >
Community
Forums
View all forums
Blogs
View all blogs-
 The five best things I tried this month
Posted by 11280Adrienne Wyper
-
 Learning Italian - è fantastico!
Posted by 11320Carol Muskoron
MORE FROM ALLABOUTYOU
View by magazine :
Contact | About Us | Privacy | Complaints | Terms & Conditions | Cookie Policy | Advertising | Site Map| Popular Forum Threads
© Hearst Magazines UK is the trading name of The National Magazine Company Ltd, 72 Broadwick Street, London, W1F 9EP. Registered in England 112955. All rights reserved.
All About You, Part of the Hearst UK fashion and beauty network © Copyright 2024