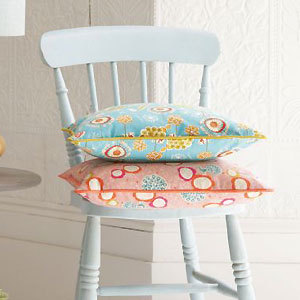
Make a cushion with zips and piping: free sewing pattern
Give a pair of handmade cushion covers a really professional finish with a zip fastener and decorative edging. For seasoned stitchers

Once you have mastered edging techniques, there is no end to the different variations you can make. We used a contrast colour of piping around the edges, but you could insert any type of edging—lace for a bedroom, bobble trim for a child’s room, for example. Alternatively, you could use a plain fabric and decorate it with a braid or ribbon trim or appliqué a motif to the front. Let your imagination run wild!
You will need:
• 50 cm x 137cm wide plain or small multi-directional fabric
• 70 cm x 137cm wide contrasting fabric for the piping
• 30cm matching zip
• 1.8m No 5 piping cord
• Matching thread
• 41 x 41cm cushion pad
Note 1.5cm seam allowances are included unless otherwise stated. Stitch seams with right sides together, unless otherwise instructed.
To make
Cut out one 43 x 43cm front piece, with two edges on the straight grain, parallel to the selvage. Cut out two 43 x 23cm back pieces, with the long edges on the straight grain.
Place the two back pieces on top of each other, with the raw edges matching, and tack the centre back edges together. Mark the zip position with a piece of tailor’s chalk or a chalk pencil along the centre back seam allowances, 6.5cm in from each short edge. Machine stitch the zip in place, using the following instructions, you will also need to work three or four stitches across the top of the zip to the centre seam line, pivoting your work as shown for the bottom of the zip.
Stitch the garment seam up to the zip notch; reverse stitch to secure. Adjust your machine stitch length to the largest size and machine tack the zip opening edges together without reverse stitching at the ends. Using a sharp pair of small scissors, snip the stitches on the bobbin thread at 12mm intervals along the zip opening, to allow for easy removal later on. Neaten the seam turnings and press the seam open. Use the 3-step zigzag stitch, usually used to neaten synthetic fabrics and other fabrics that tend to pucker. First, trim the edges to remove any fraying, then refer to your instruction manual for the correct stitch settings. Place the edge of your fabric under the overcasting foot, with the pin on the foot along the edge of the fabric, and stitch along the raw edge to neaten.
Place the zip face down on the seam turnings, so that the zip teeth run centrally down the seam and the bottom “stopper” is just below the notch. Pin and tack the zip in place.
Working from the right side of the garment, with a regular stitch length on your machine, stitch the zip in place. To do this, have your zip foot to the left of the needle; starting just below the zip stopper at the seam line, work three or four stitches across the bottom, and stitch up to the top of the zip, keeping your stitching parallel to the seam line. Reverse stitch at each end of the stitching to secure.
Re-position the zip foot to the right of the needle; starting again at the base of the zip, stitch the other side in place, as before. Remove the tacking stitches and unpick the seam covering the zip teeth. Make up and attach the piping cord to the right side of the front.
To gauge the width of your fabric strip, measure around the cord and allow an extra 3cm for seam allowances. Alternatively, fold a corner of your fabric over the piping cord and pin, encasing the cord snugly, then measure 1.5cm out from the pin and cut. Open out the fabric strip to find the correct width.
Cut out and make up the bias fabric strips following steps 1–3 of 'How to make bias binding', below. To cover the cord, place the piping cord down the centre of the bias strip on the wrong side. Bring the long edges of the bias strip together around the cord and stitch down the length close to the cord, using a zip foot on your machine.
Tack the piping to the right side of one piece of fabric, with raw edges level and the cord facing inward. If the piping is going around a corner, snip into the piping seam allowances to help it bend. If the piping is going around a curved edge, clip into the piping seam allowances at regular intervals to allow it to curve smoothly. Cut across the corner of the seam turnings close to the stitching, as for a right-angled corner, then trim away another sliver of fabric from each side, as shown. The aim is to reduce the fabric in the seam allowances so that, when the corner is turned right side out, the seam allowances will have room to lie flat.
If the ends of the cord need to be joined, unpick the machine stitches on the piping for about 5cm at each end and fold back the bias strip. Trim the cord ends so they butt together, then bind the ends together with thread. Turn under 6mm of fabric at one end of the bias strips to neaten, and slip this over the raw end. Tack the ends neatly in place.
Open the zip and attach the back using the following. Lay the second fabric piece over the first, with right sides facing and raw edges level. Pin, tack, and machine stitch the pieces together, close to the cord, using a zip foot on your machine. Remove the tacking stitches.
Neaten the seam allowances together (see above), remove the tacking stitches, trim the corners (see above), and turn the cover through to the right side. Insert the cushion pad through the zipper opening.
How to make bias binding
Bias binding is a bias strip of fabric with folded edges, which is used to neaten a straight or curved edge in a practical or decorative way. It can be purchased ready-made from good notions (haberdashery) stores, normally made from cotton, poly-cotton, or satin acetate. However, the color choice can be quite limited and the widths are generally restricted to 12–15mm and 20–25mm. It is more satisfactory to make your own binding, which will match your project exactly.
Bias binding is made from strips of fabric cut diagonally across the fabric’s width following the bias grain.
1. To find the bias of the fabric, fold the raw edge (running across the width of the fabric from selvage to selvage) over to form a triangle, so that it lies parallel to one of the selvages. Press and cut along the line.
2. Draw chalk pencil lines parallel to the bias, to your required width; this should be twice the finished flat width of the binding. Cut along these lines until you have enough strips to make the length you require to go all around the edges
of your project.
3. To join bias strips together, cut the two ends that are to be joined at a 45˚ angle. Place one strip on top of the other, right sides together, and stitch the pieces together diagonally — that is, on the straight grain. Trim the seam turnings and press the seam open (right). With wrong sides facing, press the strip in half along its length. Open the strip out flat and press the long, raw edges over to the wrong side to meet at the central pressline.


