Register with us for competitions, online recipe book and chat


Sew a sewing machine pincushion: free sewing pattern
Use oddments of cotton fabric to make our cute pincushion
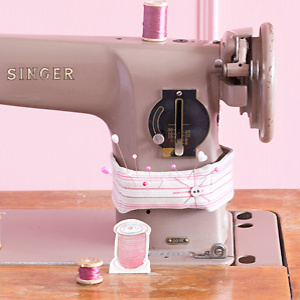
This pincushion is a kind of padded 'belt'that you can fasten around the front of your sewing machine. It’s so quick and easy to make and so practical to use when you are machining that you’ll wonder how you ever got by without it.
You will need
• Tape measure
• Two pieces of sturdy fabric (see Step 1 for size)
• Scissors, needles, and pins
• Machine embroidery threads (optional)
• Decorative button (optional)
• Sewing machine
• Sewing thread to match fabric
• Polyester fibre stuffing. See more stuffing options here
• Ruler
• Tacking thread
• Two snap fasteners
 1. Measure the circumference of the upright part of your sewing machine and add 8 cm. Work out how deep the pincushion can be without interfering with the machine’s functions and add 3 cm. Cut two pieces of fabric to these measurements.
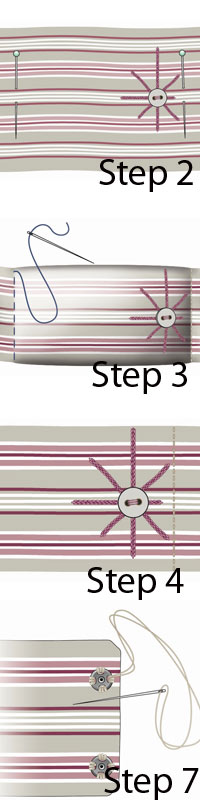
2. Fold one strip in half lengthways and mark the middle with a pin. Measure the width of the front of the upright part of your machine. Using pins, mark this width on the fabric band, centering it on the midpoint pin, which you then remove. The marked area will be the pincushion itself and you can embroider this area - or not - as you wish. Keep the stitches at least 1.5 cm from the top and bottom edges. I machine-embroidered a simple star in two types of pink thread and stitched a vintage linen button into the centre of it.
3. Remove the marker pins, then pin the two pieces right sides together, matching all raw edges. Set the sewing machine to a medium straight stitch. Taking a 1.5cm seam allowance, sew along one long edge, across a short end, and back along the other long edge. Turn right side out and press. Turn in 1.5 cm on the open short end and press.
4. Using pins, mark out the pincushion section as in Step 2. Using matching thread, machine-sew a line across the band at the marked point furthest from the open end of the band. Secure the threads firmly on the back of the band.
5. Reposition the pin marking the other end of the pincushion section so that it is only in the front piece of fabric. Push polyester stuffing down the band, using a ruler to push it along, to fill the pincushion section of the band (between the stitched line and the remaining pin). Pack the stuffing in as tightly as possible. Replace the pin through both layers, then tack along the pin line.
6. Fit a zipper foot to the sewing machine and sew along the tacking line. Secure the threads on the back, as before. Sew across the open end of the band. Remove the basting stitches.
7. Using doubled thread, sew snaps to each end of the band, positioning them so that the band fits tightly around the upright part of the sewing machine.
 This sewing machine pincushion is taken from 'Super-cute Pincushions' by Kate Haxell (CICO, £12.99).
You might also like...
See lots more pincushions and needle cases to make
Sewing projects for fabric scraps More creative ways with remnants


Post your comment
Join us here...


Click on a magazine title to see all its
online features and news

Stain buster
Our guide to removing smudges, spots, and other spills.
See more stain busting solutions >
Community
Forums
View all forums
Blogs
View all blogs-
 The five best things I tried this month
Posted by 11280Adrienne Wyper
-
 Learning Italian - è fantastico!
Posted by 11320Carol Muskoron
MORE FROM ALLABOUTYOU
View by magazine :
Contact | About Us | Privacy | Complaints | Terms & Conditions | Cookie Policy | Advertising | Site Map| Popular Forum Threads
© Hearst Magazines UK is the trading name of The National Magazine Company Ltd, 72 Broadwick Street, London, W1F 9EP. Registered in England 112955. All rights reserved.
All About You, Part of the Hearst UK fashion and beauty network © Copyright 2024