Make a padded headboard
Lie back in style with this padded headboard - a great way to transform your bedroom
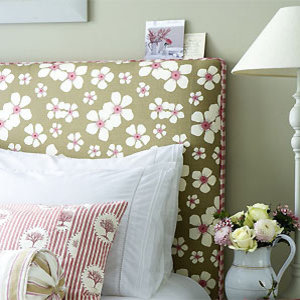
A beautiful padded, patterned headboard can completely transform a bedroom. Here, Wild Rose fabric, in rabbit and damson, looks stunning with mushroom-coloured walls and crisp white bed linen. The pink of the piping and a cushion in Four Seasons add a warm, feminine touch.
You will need
● main fabric (see below for quantity)
● contrast fabric (see below for quantity)
● matching sewing thread
● medium-sized cable cord or piping cord (see below for quantity)
● sew-on Velcro tape (see below for quantity)
● sheet of 2cm-thick MDF or plywood
● lightweight wadding (see below for quantity)
● unbleached muslin (see below for quantity)
● staple gun
● two 89cm-long pieces of 5cm x 2.5cm wood (such as pine) with a vertical 1cm-wide slot cut up the centre of each – the length of the slots will depend on the height of the fixing bolts on your bed. If the bed does not have fixing bolts, these pieces are not necessary.
● 3cm-long wood screws (not needed if the bed does not have fixing bolts)
Estimating quantity
● For the board length, if your bed has fixing bolts for a headboard, measure from the top of the bed base to the desired height. If it does not, then measure from the floor to the desired height. For the board width, measure the width of the bed base.
●For the wadding, allow for enough to cover the board plus 5cm all around. You may need to join widths.
● For the muslin, allow for a front piece that is the same size as the wadding and a back piece the same size as the board. You may need to join widths.
● For the main fabric, allow for two panels of fabric, each the height measurement – measuring only down to 10cm above the bed base, as you don’t need to cover the board below that – by the width measurement, plus 1.5cm all around for the seam allowances. You may have to join fabric widths to obtain your correct panel widths. When estimating the quantity required, allow a further 1cm all around for the thickness of the padding. (The headboard is measured again after step 1 to make sure the cover will fit perfectly.)
● For the cable cord or piping cord, you will need to allow enough to go up the two sides of the main panel and across the top, plus 10cm.
● For covering the cord, first gauge the width of your fabric strip. To do this, measure around the cord and allow an extra 3cm for seam allowances. Allow enough bias strips of contrast fabric of this width to fit the length of your cord.
● You will need enough Velcro tape to fit down one side edge of the headboard cover, less 10cm.
Tip: for a country-style headboard cover, instead of using Velcro tape, leave both sides open 10cm from the top and finish the edges with plain tape. Attach four sets of narrow ties down both sides and tie the back and front pieces together with bows. Click here for how to make fabric ties.
To make
Cut out the wadding and muslin pieces, and join widths if necessary (for the wadding use lapped seams, in which one raw edge overlaps the other). Place the board in the centre of the wadding and wrap the wadding over onto the back of the board. Staple in place, mitring the corners. Place the padded board, wadding side down, on the wrong side of the muslin front piece, and repeat the procedure, gently pulling the muslin as you work. Press under a 2cm hem on all four edges of the muslin back piece, then centre it on the back of the board and staple in place, covering the edges of the front piece.
Measure the padded headboard to calculate the exact sizes of the front and back panels. From the main fabric, cut out these panels. Join fabric widths, if necessary, to obtain the correct widths, positioning the full width in the centre. From the contrast fabric, cut out the bias strips, seam them together to obtain the correct length for covering the cord, and make up the piping (using the method listed in the general sewing terms and instructions at the end of the feature). With right sides up and raw edges even, pin and tack the piping to the side and top edges of the front panel. To help the piping go around the corners, snip into the piping seam allowance, as shown.
To finish the ends, trim the piping even with the bottom edge of the front panel. Undo about 5cm of the tacking and the stitching on the piping and trim away 1.5cm of the uncovered cord. Fold the covering strip over the end. Pin the piping in place. Using a zipper foot on your machine, sew the piping to the front panel, stitching as close to the cord as possible.
With right sides together and raw edges even, place the back panel on top of the front, sandwiching the piping in between. Pin the pieces together up one side and across the top, and then pin them for just 10cm down the opposite side.
Using a zipper foot on your machine, machine-stitch the back panel to the front panel along the pinned edges, re-sewing over the piping stitching line and making sure you get as close to the cord as possible. Snip into the seam allowance around the corners.
Finish the bottom raw edges of both the front and back panels with a machine zigzag stitch, or use an overlocker if you have one. Turn the cover right side out, push out the corners, and press the cover flat.
Open the two sides of the Velcro tape and pin the section with the looped surface to the wrong side of the opening on the front panel, butting the edge of the tape against the piping. Machine-stitch the tape in place around all edges of the tape. Repeat on the other edge of the opening, stitching the hooked-surface side of the tape to the right side of the back panel.
Pull the cover over the headboard and smooth it down until it fits snugly. Press the two sections of the Velcro tape together to close the opening edge. If using the two lengths of wood, screw them to the back of the headboard in line with the fixing bolts on the bed, and then attach the headboard to the fixing bolts on the bed. Otherwise, rest the headboard on the floor and push the mattress up to it, concealing the lower edge of the cover
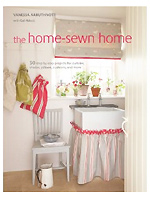 This project is taken from 'The Home-sewn Home' by Vanessa Arbuthnott with Gail Abbott (Cico Books, £16.99).
You might also like…
See all of our Vanessa Arbuthnott patterns


