

Sew embroidered Christmas stockings: free sewing pattern
Choose from a tree, star or bauble design

1 Enlarge the stocking template (click the 'print' button at the top of the page to print out this project, complete with templates. Click here to see the stocking templates and stitch guide, on page 2.) to the chosen size and use it to cut out two stocking shapes from a piece of felt or boiled wool. Copy the Christmas tree shape and cut it out from a piece of contrasting felt.
2 Put a sheet of dressmaker’s carbon paper on top of the felt tree shape with the coloured carbon side face down. Place the tree template on top. Draw over with a pencil to transfer the embroidery pattern onto the felt.
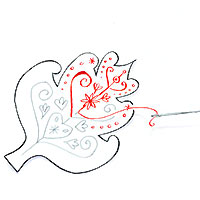 3 Follow the stitch guide on the template and use doubled red embroidery thread and an embroidery needle to replicate the pattern (illustration 1). A bullion knot is similar to a French knot, but creates a longer coil. Make small ones by winding the thread twice around the needle and the largest ones by winding it four times around the needle.
4 Centre the tree and, positioning it 10cm down from the top edge, sew it to the front of the stocking using appliqué stitch.
5 Embroider the star at the top and knots around the outline of the tree in cream.
6 Place the front and back sections of the stocking right sides together and machine stitch down the right edge to the heel, leaving a 13mm seam allowance.
 7 Open the stocking out flat with right sides facing up. Fold under a hem of 2.5cm along top edge. Pin a piece of ribbon 52cm long around the top edge of the right sides, 1cm down. Machine-stitch the ribbon as far as the middle seam on the front section (ill. 2). Sew a few rows vertically across the ribbon.

8 Fold a loop of ribbon at the middle seam (ill. 3), then repeat the vertical stitching to secure the ribbon on the back section.
9  With right sides together, sew up the remaining sides, strengthening the top 6cm of the side seams with zig-zag stitch (ill. 4). Trim the seam allowance and clip round the curved edges. Turn right side out, and then press to finish.

This project is taken from 'Christmas Crafting in No Time', by Clare Youngs (Cico Books, £14.99).
More from the same book:
Make a paper Christmas angel
Make a felt snowflake garland
You might also like...
See all of our Christmas stockings to make
See all of our hundreds of ideas for a hand-crafted Christmas


