Register with us for competitions, online recipe book and chat


Sew a Cath Kidston rose linen pillowcase: free sewing pattern
Transform a worn tablecloth for a new life as a pillowcase

A floral tablecloth, in good condition apart from a torn centre, is given a new lease of life and transformed into a pretty pillowcase backed with linen cut from an old sheet.
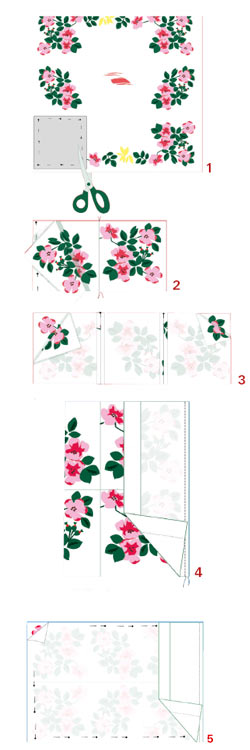 1 Draw a 28cm square template on dressmaker’s pattern paper. Avoiding any damaged areas, cut six squares from the cloth. You can mark guidelines on the template to make sure that the printed design will line up across the squares (ill. 1).
2 Lay the patches out in order and, starting at the bottom row, pin the side edges of the centre and left square together with right sides facing. Machine-stitch with a 1.5cm seam. Repeat with the right square, then join the three top patches (ill. 2).
3 With right sides facing, place the rows together so the long edges line up and pin at right angles for a precise match. Pin the rest of the seam and machine-stitch 1.5cm from the edge (ill. 3). Press this seam open.
4 Take a piece of plain linen and cut out one 53cm x 20cm flap and one 78cm x 53cm back panel. These two pieces were cut so that the original hemmed edge lies along the 53cm sides, which gives finished edges at the opening. If you use this method, adjust the width of the back panel to 76.5cm and the depth of the flap to 18.5cm.
5 If it isn’t already neatened, make a double hem along one long edge of the linen flap. Press under a 5mm turning, then press a further 1cm turning and top-stitch the fold. Hem one short edge of the back panel.
6 Pin the long raw edge of the flap to one short edge of the finished front. Machine-stitch together, leaving a 1.5cm seam (ill. 4).
7 Lay the front panel out with the right side upwards and open the flap. Position the back panel over it so that the hemmed edge lies along the seam between the flap and the front panel. Turn the flap over the back panel and pin together along the top, bottom and left side edges (ill. 5).
8 Machine-stitch the pinned edges, then trim the seam allowance to 6mm. Neaten with a zigzag or overlocking stitch. Turn the pillowcase right side out, ease out the corners and press the seams.
 All of these projects are taken from 'Patch!' by Cath Kidston
You might also like...
See all of the Cath Kidston patchwork projects from Country Living January 2012
Get into patchwork and quilting: beginner's guide and projects to try
Make your bedroom beautiful: bedlinen and beyond
10 things you didn't know about Cath Kidston


Post your comment
Join us here...


Click on a magazine title to see all its
online features and news

Stain buster
Our guide to removing smudges, spots, and other spills.
See more stain busting solutions >
Community
Forums
View all forums
Blogs
View all blogs-
 The five best things I tried this month
Posted by 11280Adrienne Wyper
-
 Learning Italian - è fantastico!
Posted by 11320Carol Muskoron
MORE FROM ALLABOUTYOU
View by magazine :
Contact | About Us | Privacy | Complaints | Terms & Conditions | Cookie Policy | Advertising | Site Map| Popular Forum Threads
© Hearst Magazines UK is the trading name of The National Magazine Company Ltd, 72 Broadwick Street, London, W1F 9EP. Registered in England 112955. All rights reserved.
All About You, Part of the Hearst UK fashion and beauty network © Copyright 2024