

Make a play sail
Place an old tin bath underneath this smart sail, designed by Sania Pell, to create a boat

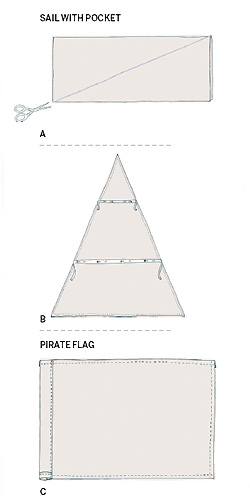
1 Cut out a 170cm x 140cm rectangle of canvas. Lay it on a work surface and check that the cut edge is straight.
2 Fold the fabric in half lengthwise. With a pencil or tailor’s chalk, draw a diagonal line from the top right-hand corner of the fabric to the bottom left-hand corner. Cut along this line through both layers (A) and then open out the triangle.
3 Turn under a 1.5cm hem on all three edges, press, pin in place and stitch. Pin two lengths of striped ribbon to the sail, parallel to the bottom edge, dividing the triangle into three sections (B). Stitch the ribbons in place.
4 For the pocket, cut out a 38cm x 30cm rectangle from canvas. Turn under and press a 1.5cm hem on the side edges and fray the top and bottom edge using a pin to tease out threads parallel to the edge. Take a kit of ten jumbo metal grommets (12mm) and, following the manufacturer’s instructions, apply three grommets along the top edge of the pocket, and one grommet to each corner of the sail. Pin the pocket at the centre of the bottom portion of the sail, and topstitch in place along the side and bottom edges, leaving the top edge open.
5 Following the manufacturer’s instructions, iron fusible bonding web to the wrong side of a piece of denim. Using the star template (see page 2) , draw a star on the backing paper. Also draw the mirror image of each initial or number you would like to include. Cut out the shapes, remove the backing paper, and iron them in place on the sail. Tie a length of wide rope (5mm) or strong ribbon or string to the grommets at the two bottom corners of the sail, and tie the other ends to pieces of furniture. Hang the top grommet from a secure screw in the wall, or use a third length of rope to tie it to a tree.
6 For the flag, cut out a 50cm x 35cm rectangle from the canvas left over from cutting out the triangle for the sail. Turn 1.5cm to the wrong side along the long bottom edge, and then press, pin, and stitch. Now turn 5mm and then a further 1.5cm to the right side along one short side edge; press, pin, and machine stitch. Finally, turn 1.5cm to the wrong side along the other short side edge and the long top edge; press, pin, and stitch. Doing the hems in this sequence produces a channel at one side, with an opening at the bottom but not at the top (C).
7 Using the skull and crossbones pattern (see page 2) cut out the shapes from the denim that you backed with fusible web in step 5. Remove the backing paper and iron the motifs to the right side of the canvas. Apply a grommet to each of the four corners. Insert a stick into the channel.
This project is taken from 'The Homemade Home for Children' by Sania Pell (Cico Books, £16.99).
You might also like...
How to make a sail-style awning
Make a pressed-flower nameplate for a child's bedroom door
More easy craft ideas for children's rooms


