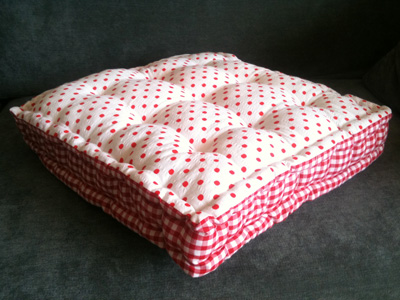
Sew a quilted floor cushion: free sewing pattern
Get into cushion making with this cosy, quilted floor cushion free sewing pattern
You will need…
• 1 metre cotton fabric (or equivalent if you’re using contrasting fabrics as we have)
• Polyfill stuffing (we used the filling from a pillow)
• Strong thread for quilting
• A long needle (we used a long darner needle, but it’s easier if you can use a long doll makers needle or an upholstery needle).
Cut out
You need 2 x cushion sides measuring 45cm by 45cm and 1 x cushion gusset (the side part) measuring 10cm by 180cm. If your fabric isn’t long enough, add 2cm to the length measurement (for a joining seam allowance) and cut out in two parts.
Start sewing
First, the gusset. If you’ve had to cut two gusset strips in order to make it long enough, you need to join them together. On each gusset strip, place two short ends right sides together and stitch 1cm from the raw edge. Press the seam open.
Now you can start pinning the gusset to one of your cushion sides.

With right sides together, place the gusset strip on top of one cushion piece, matching raw edges. Pin along one side (image 1).
Tackling the corners
When you get to the corner, you need to snip the gusset about 0.5/0.75cm (not so far that the cut will protrude beyond the stitching line). This allows the gusset strip to turn the corner neatly and makes it far easier to stitch (image 2).
Pin carefully around all the sides and then straight stitch 1cm from the raw edge. Remember to leave a 15cm gap in the middle of one of your seams – you’ll need a hole in order to turn the cushion the right way round and for stuffing.
Now join the end pieces of the gusset strip. Pin them together, stitch and trim off any excess. The gusset should now form a square ‘box’ shape.
Now you need to attach the other cushion piece to the gusset. Pin together, matching and clipping the corners as before. This time stitch all the way round without leaving a hole for stuffing (unless you forgot to do it before!).
Stuff your cushion with polyfill stuffing. Make sure you distribute the stuffing evenly and there are no empty areas in the corners and side edges.
Sew up the hole in the seam with a slip stitch (image 3).
Mark your quilting points
Take a needle and thread it with a contrasting colour to your cushion (image 4). Measure the cushion so that you have 9 evenly spaced points. (On this size cushion, ours were spaced at 10-11cm intervals.)
With the contrasting thread, sew a few tailor’s tacks into each point – these will be the quilting points. Do this on both sides of the cushion.
Start quilting
Thread your long needle with strong thread, doubled over and tied with a big knot (image 5). Starting at your middle tailor tack, push the needle right through the cushion so that it comes out at the same position on the opposite side. Make about 4 stitches from one side of the cushion to the other, drawing in the thread so the stitching forms a squashy dimple. When you feel the stitching is secure and ending on the same side that you started, make a small stitch and pass the needle through – pull it tight, knotting it securely. Trim, leaving a tuft of thread.
Now repeat with the other eight tailor tacks. You’ll probably need to thread the needle anew for each point.
Quilting the sides
When you’ve quilted the middle of the cushion, you now need to quilt around each side (image 6). Thread your needle (you can probably use a shorter one here) with strong doubled-over thread. Start at one corner about 2cm in from the edge. Pinch together the top edge of the cushion by the seam and part of the adjoining gusset. You’re looking to make stitches about 2cm away from the seam. Push the needle through the cushion top so it emerges in the gusset strip 2cm from the seam. Then, push the needle diagonally through the gusset strip so it emerges on the cushion top about 3cm away from where you just started. Keep working your way along the cushion edge in this zigzag manner, pulling the stitches tight so they draw the cushion top and side together. When you’re back to the beginning, secure with a knot and trim the thread.
Then flip the cushion and repeat on the other cushion edge. When you’ve done that - you’re finished! Lounge back and enjoy it!
You might also like...
Stylish seating: make your own
See all of our cushion covers to sew
Cushions to knit and crochet
100+ new looks for every room in the house - made by you


