

Stitch a Union Jack felt cushion: free sewing pattern
An iconic embroidered design, featuring embroidery and appliqué, by Jan Constantine

Materials and equipment
● 34 x 50cm (131/2 x 20in) feather cushion pad
● 50cm (20in) of grey wool felt (minimum width 130cm/51in) for the cushion cover
● 15cm (6in) of cream wool felt (minimum width 110cm/43in) for the wide cross and diagonal bands
● 15cm (6in) of red wool felt (minimum width 70cm/28in) for the narrow cross and diagonal bands and the red heart
● Two 4 x 36cm (13/4 x 14in) pieces of grey cotton fabric (dyefast) for the back opening facings
● 40 x 40cm (16 x 16in) of bonding web
● 10 x 40cm (4 x 153/4in) of iron-on interfacing
● Two buttons, 2cm (3/4in) diameter
● Front cushion pattern with heart, cross and diagonal band design templates (click here to download the pattern in PDF format)
● Back cushion and facing patterns (click here to download the pattern in PDF format)
● Sharp, hard pencil
● Tailor’s chalk or marking pencil
● Metal ruler
● Embroidery kit and stranded cotton embroidery thread (dyefast) in red and cream
● Sewing machine, matching thread, sewing kit and thimble
● Iron and ironing cloth
Preparation
Prepare the wool fabric by pressing. Using a photocopier, enlarge the front cushion pattern with the heart, cross and diagonal band templates and the back cushion and facing patterns by 220 per cent.
Cutting out
Pin the pattern on to the fabric and, using tailor's chalk, trace neatly around each piece, checking that the straight grain line is still parallel with the selvedge. Remove the pins and the pattern to reveal the marked shapes. Cut round the shapes with sharp dressmaker's scissors, just on the inside of the chalk line. It is helpful to look ahead at the line as you cut, to produce more accurately cut pieces.
Cut two to pair: cut out one using the pattern the right way up, then turn the pattern over so that it is the wrong way up before cutting out the second. It is necessary to cut fabric to pair when the front of the cloth is different from the back.
Cut out one cushion front and two cushion backs in grey wool felt. Cut out two back facings in grey cotton and two in iron-on interfacing. Then cut out the two wide cross bands, measuring 47.5 x 7cm (183/4 x 23/4in) and 36 x 7cm (141/8 x 23/4in), in cream wool felt. Cut out the two wide diagonal bands (to pair), each measuring 59.5 x 4cm (231/2 x 11/2in), in cream wool felt. Trim the corners to fit.
Appliqué
Using a sharp pencil, trace the heart design, the two narrow cross bands and the two narrow diagonal bands onto the smooth side of the bonding web. Iron the bonding web onto the wrong side of the red wool felt and carefully cut out the heart shape and the bands inside the pencil lines.
 Making up the bands
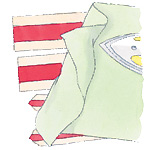
Peel off the bonding-web backing and position each red band lengthways onto the centre of the corresponding cream band. Using an ironing cloth between the hot iron and the wool felt to protect it, iron to fuse the strips together (left).
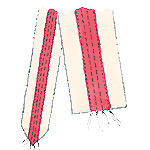 Working on the narrow diagonal bands first, machine stitch close to the edges of the red band. Set the machine to a large stitch length (three stitches to 1cm 1/2in) and topstitch two parallel rows between the stitched edges (approximately 3mm/1/8 in apart), so that the spacing is equal between the four rows. Repeat this with the wider cross bands, spacing the two lines of topstitching equally apart (approximately 12mm 1/2in) between the stitched edges (right).
 Attaching the bands
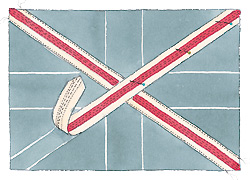
Using a ruler and tailor’s chalk or a marking pencil, mark the positions of the cross and diagonal bands onto the front cushion piece. Matching the corners and using the guidelines, lay one diagonal band in place. Pin, tack and machine stitch the band close to the cream edge on both sides. Lay the second diagonal band in place and repeat the above (left).
Lay the horizontal cross strip in place, using the chalk guidelines. Pin, tack and machine stitch the band close to the cream edge on both sides. Repeat for the vertical cross strip.
 Attaching the heart
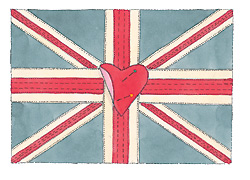
Pin and then tack the heart onto the centre of the Union Flag cushion front, right side up (left). Using an ironing cloth as before, iron to fuse it in place.
Embroidery: Using four strands of red embroidery thread, cross stitch evenly along the grey base wool felt and the cream edges of the diagonal and cross strips. Make the stitches 1cm (1/2in) long and 5mm (1/4in) wide.
![]() Using four strands of cream embroidery thread, carefully outline the heart with blanket stitch, making the stitches 5mm (1/4in) long and spacing them 5mm (1/4in) apart. The layers of appliqué will be quite thick in some areas, so it is advisable to use a thimble for protection (left).
Using four strands of cream embroidery thread, carefully outline the heart with blanket stitch, making the stitches 5mm (1/4in) long and spacing them 5mm (1/4in) apart. The layers of appliqué will be quite thick in some areas, so it is advisable to use a thimble for protection (left).
Making up the cushion
Back facings Using the iron, press iron-on interfacing to the wrong side of the cotton back facings. Turn one long edge of each facing under by 1cm (1/2in) and press the hems in place (see picture 4).
With right sides together, pin and tack the other long edge of each facing to one of the wool felt cushion back pieces, then machine stitch the 1cm (1/2in) seams (see picture 5).
Press the seams open and then fold the facings back onto the wrong side of the cushion backs and press. Pin, tack and machine a line of stitching 3.5cm (11/2in) from the edge to hold each facing in place. Machine two parallel lines of stitching, one along each edge and the other 1cm (1/2in) in from the edge.
Buttonholes Mark two buttonhole positions on the wrong side of the right cushion back piece, positioning them 2cm (3/4in) in from the edge and 12cm (43/4in) apart. Work two 2.5cm (1in) buttonholes by machine or by hand.
Embroidery On the right back piece, work blanket stitch along the edge of the opening with six strands of red embroidery thread, using the inner machine-stitched line as a guide and spacing the stitches 1cm (1/2in) apart.
Lay the right back piece over the left back piece, matching up the balance points at the top and bottom. Sew two buttons onto the left cushion back at the marked points, corresponding with the buttonholes on the right back piece.
Do up the buttons and tack the two pieces of the cushion back together at the top and bottom to secure.
Joining the front and back
With wrong sides together, pin the front and back of the cushion together, then tack and machine stitch 1cm (1/2in) seams around all four edges. Machine a parallel stitch line along the outer edge of the cushion.
Embroidery: Finally, press flat and trim the edges of the fabric, if necessary, to neaten. Using six strands of cream embroidery thread, edge the cushion with blanket stitch. Work neat stitches using the inner stitch line as a guide and space them 1cm (1/2in) apart
Finishing
Lightly press the finished cushion cover with a slightly damp cloth between the hot iron and the fabric to prevent it from becoming shiny.
Insert the cushion pad and do up the buttons.
 This cushion is taken from 'Love Stitching' by Jan Constantine (Aurum Press, £20).
You might also like...
Get started with embroidery: basic stitch guide
See all of our patriotic craft projects here
All kinds of cushion covers to sew


