Register with us for competitions, online recipe book and chat


Make a bluebird brooch
Pin a little symbol of handmade happiness to your lapel
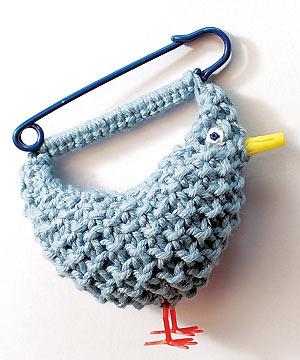
This project shows you how to make a brooch with traditional knitting and crochet alongside altered everyday objects. Change the colour to suit your own taste or use the starting point to make a beaked creature of your own design.
What you will need
Materials
● light blue cotton yarn
● white cotton yarn
● kilt pin 10 cm (3.9 in) in length
● feet from an Easter chick toy
● one yellow Rawlplug®
● blue merino felt
● two small blue beads
● cotton thread (same or similar colour to the beads)
Tools and objects
● 2 mm (0.08 in) crochet hook
● 2-3 mm (0.08-0.1 in) knitting needles
● sewing needle (big enough for yarn)
● spray paint for metal in dark blue
● end cutters
● scrap paper or newspaper
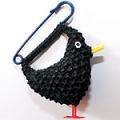 Variation
Changing the colour of the yarn can change the character of the bird brooch. Try using a black yarn to make a blackbird brooch or brown and red for a robin. You might like to use different thicknesses of yarns and needles and try using a plain knit or stockinette stitch to create a different surface.
Health & safety
Take care when spraying the kilt pin. Make sure you use the paint in a well-ventilated area and always read the instructions on the can
Step 1 Undo the fastening on a 10 cm (3.9 in) kilt pin. Place on a piece of scrap paper and spray one side with the metal spray paint. Leave to dry and then turn the pin. Spray the other side and leave to dry. Always follow the specific instructions on the spray can as drying times vary and you may also need to apply more than one coat of paint.
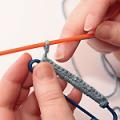
Step 2 Take your light blue yarn and your crochet hook. Tie a knot around the bottom section of the kilt pin next to the loop (not the side that will be pinning onto your garment). Make sure you leave a 10 cm (3.9in) piece of yarn to secure later. Ensure that the kilt pin is fastened when you are handling it.
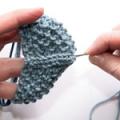
Step 3 Hook the yarn around the pin, making a loop to crochet into. Hook the loop and wrap round the pin, drawing another loop through, until the whole lower section of the pin is covered.
 Step 4 Next take your knitting needles and, where the crochet ends, use the yarn to put a slip knot onto the needle.
Step 5 Cast on a stitch by holding the needle with the slip stitch in your left hand and the free needle in your right hand. Insert the right needle through the front to the back of the slip knot. Next take the yarn around the right needle and pull through a stitch and then put the stitch onto the left needle. Repeat this until you have 23 stitches in total.
Step 6 Next, take the right needle again and slip it into the first stitch from the front to the back. Take the yarn around the right needle from back to front and then use the right needle to draw a loop through the stitch and transfer to the right needle. This is a knit stitch.
Step 7 Take the yarn and place it in front of the right needle. Slip the right needle into the next stitch on the left, but at the front this time. Take the yarn and loop it around the right needle from the right to the front. Bring the right needle out, catching the loop of yarn through the stitch. Transfer this onto the right needle. This is a purl stitch.
Step 8 Take the yarn to the back of the right needle and repeat the knit stitch. Continue alternating from knit to purl until all the stitches are on the right needle. Then take the right needle and transfer it to your left hand and stitch another row as before - knit, purl, knit, purl and so on.
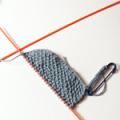 Step 9 Continue until your knitting grows in length to 5 cm (1.9 in.). By alternating the stitches you are creating a pattern known as moss stitch. This only works with an odd number of stitches. With an even number the pattern will look very different and is known as rib stitch.
Step 10 Cast off by knitting the first two stitches onto the right needle. Then use the tip of the left needle to hook the first stitch over the second, off the needle. Knit another stitch so you have two on the right. Hook the first over the second again. Continue until you have cast off all the stitches. When you are left with one you can pull the yarn through to knot in place.
Step 11 Cut off a 60 cm (24 in.) length of the yarn. Stitch the loose edge of the knitting around the kilt pin with the shorter length of yarn.
 Step 12 Fold the bottom edge of the knitting in half and stitch together. Run the yarn back along where you have stitched.
Step 13 Fill the pocket you have created with blue merino felt and sew along the top to seal the felt inside.
Step 14 Stitch on the feet and Rawlplug® beak with the same yarn. You may need to snip away some of the Rawlplug® with end cutters if you find it too long. Both the feet and beak should stitch into place quite easily. You will be able to poke the beak into the knitting before you secure it with stitches.
Step 15 Last, create the eye by stitching a French knot into either side. Tack the white cotton into place where you want the eye, and twist the yarn around the sewing needle three times. Then pass through near the same hole while holding the length in place with your left thumb, so that it pulls through neatly. Repeat this on the other side and then stitch the two beads into place over the top. Any loose threads or yarns can be stitched in and out of the knitting to secure.
 This idea is taken from 'Mixed Media Jewellery' by Joanne Haywood (AC Black, £16.99).
You might also like...
Knit and crochet a corsage
Stitch a felted wool corsage
See all of our free patterns for accessories to knit
See all of our free crochet patterns


Post your comment
Join us here...


Click on a magazine title to see all its
online features and news

Stain buster
Our guide to removing smudges, spots, and other spills.
See more stain busting solutions >
Community
Forums
View all forums
Blogs
View all blogs-
 The five best things I tried this month
Posted by 11280Adrienne Wyper
-
 Learning Italian - è fantastico!
Posted by 11320Carol Muskoron
MORE FROM ALLABOUTYOU
View by magazine :
Contact | About Us | Privacy | Complaints | Terms & Conditions | Cookie Policy | Advertising | Site Map| Popular Forum Threads
© Hearst Magazines UK is the trading name of The National Magazine Company Ltd, 72 Broadwick Street, London, W1F 9EP. Registered in England 112955. All rights reserved.
All About You, Part of the Hearst UK fashion and beauty network © Copyright 2024