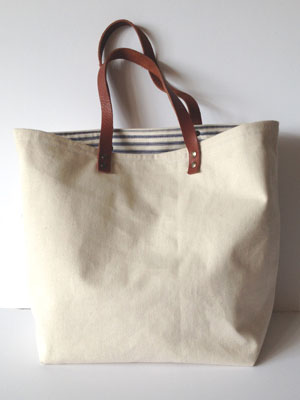
Sew a tote bag with leather handles: free sewing pattern
We love this simple tote bag's stripy lining, but feel free to pick your favourite print. By Suzanna Drew-Edwards

This makes a bag measuring 46cm by 34cm.
You will need
● For the outer: sturdy fabric such as canvas, thick linen or natural denim – 2 x rectangles measuring 48cm x 44cm
● Lining: sturdy fabric – we used ticking – 2 x rectangles measuring 48cm x 44cm
● Inside pocket: 1 rectangle of denim or canvas measuring 22cm x 15cm
● Handles: leather strapping (ours was 1.5cm wide x 50cm each handle) – or you could use an old belt
● Rivets and rivet setting pliers (available from good craft shops)
● A hole punch
Scroll down for step-by-step instructions.

Sewing the outer bag
Take your two outer pieces and place them right sides together (image 1). Pin around three sides (leave one 48cm edge open – this is the bag top). Straight stitch 1cm from the edge around all three sides.
Sewing the lining
First, the pocket. Take your pocket piece and with a hot iron, fold in the sides by 1cm (image 2). We left our top edge unfolded as we liked the selvedge trim. If you prefer, you can fold this top edge over – but if you do this, remember to stitch it down before you sew the pocket onto the lining.
Take one lining piece and with right side facing, pin the pocket piece 10cm from the top edge (image 3).
Stitch around three sides of the pocket, reinforcing your stitching at the top corners.
Now you need to sew the lining pieces together.
Place the two lining pieces right sides facing and straight stitch around three of the edges (take note which way the pocket goes so you don’t stitch up what should be the top bag edge!).
Your outer bag opening and your lining opening need to be the same measurement (image 4). This is your opportunity to make sure one isn’t wider than the other. If they are, unpick the top part of the seam and resew.
Squaring (or boxing) off the corners
This is where you create a flat bottom for your bag.
With your outer bag still inside out – take hold of the tip of one of the bottom corners and fold it so the side and bottom seams meet together – it will form a triangle (image 5). Pin it together and stitch across, backstitching at each edge.
The bigger the triangle, the wider the bottom of your bag will be. Our seam across this part measured 15cm which gave our bag a nice wide bottom.
Trim 1cm from the edge. Repeat with the other bag corner and with the corners of the lining piece (image 6).
Sewing the outer bag to the lining
First of all, unpick a 10cm hole in the middle of one side seam of your lining piece (image 7 - this will be explained in a minute).
Keep your outer bag inside out, but turn your lining so that it is the right way round (image 8).
Now… place your lining inside your wrong way round outer bag.
The right sides of each should be facing.
Match the side seams and pin the outer bag and the lining together around the top edge. Stitch 1cm away from the top raw edge.
Turning your bag the right way round
When you’ve sewn around the top edge, pull the lining out from the bag so it looks like one big deflated pillow.
Push your hand through the hole you made in the lining, and, grasping the outer bag, begin easing it through the gap – you are gradually turning it all the right way around so all the seams are neatly hidden inside the bag.
Keep going until all of the outer bag is pulled through.
Your bag should be taking shape now. Stitch up the hole in the lining and then push the lining down inside the bag (image 9).
Stitch around the upper edge so that you have a firm bag top.
Attaching the handles
With your hole punch, make two holes in each end of both handles (images 10 and 10a). We did our 1cm from the handle end and with 1.5cm between.
Now you need to make the same holes on the bag. We marked our handle positions 15cm in from the side seams. Use your leather handles as a template to mark the position of the holes on the bag.
Attach your handles by pushing the male part of the rivet (the bit with the long shaft) through the hole from the wrong side (ie the lining side) and through the bag fabric and the leather handle. Place the cap on top, and use your rivet setting pliers to squeeze the rivet closed. Repeat with all the other rivets so that your handles are securely fastened (image 11).
You might also like...
Sew a fabric-handled tote bag: free pattern
Make a wraparound leather cuff
The best bags to sew and knit: free patterns


