

Make a woolly hat from an old sweater
Recycle old woollies for a new look. By Suzanna Drew-Edwards

Ever wondered what to do with a spare hour and an old, outgrown or overwashed jumper? Put both to good use and upcycle your old woolly into a warm winter hat.
You will need:
- An old jumper
- A head to measure or an old hat to use as a template
- A button or pompom
Taking measurements
The width
Measure around the head of your hat wearer (or measure the bottom of a hat that already fits). Using this measurement, mark it out on the bottom edge of your jumper adding a centimetre for a seam allowance (ours stretched the whole width of one side of the jumper).
 The height
Using a tape measure, measure from the eyebrows to the crown of the head (the top of the head where the parting in the hair starts). This gives you the height measurement. Because we had a nice ribbed bit at the bottom of our jumper, we added 3cm to allow for a turn up at the brim of the hat.
With the sweater laid flat, mark out the height and width measurements and cut out. You should now have a rectangular piece of woollen jumper.
Stitching the back seam
With right sides together, fold your rectangle in half. Pin the edges together. Using a pen (because it’s marked on the wrong side of the fabric, you don’t see the ink), make a curved line halfway up the edge which slopes gently in at the top of the hat (see photo). This takes away some of the fullness at the top of the hat.
Using a zig-zag machine stitch, sew along this pen line and down the edge of the fabric, reinforcing it at the brim with a backwards stitch so the sewing is secure. Trim away the excess.
 Stitching the top of the hat
Using a zigzag stitch, sew around the top edge of the hat to prevent it fraying.
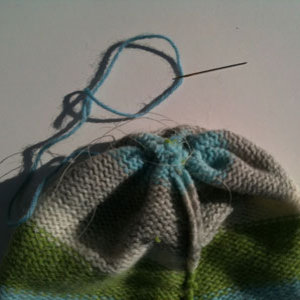
With the hat still inside out, take a needle and some strong thread and tack with big stitches all the way around the top about 0.5cm from the edge.
When you've tacked all the way round, hold the thread and push the fabric along the stitches so the fabric at the top of the hat gathers together in a bundle (see photo). Stitch together securely, catching all the raw edges in to the middle.
 Finishing off
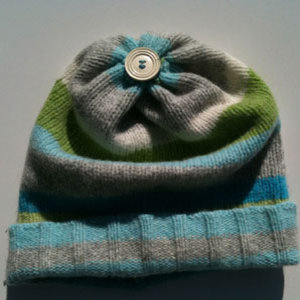
Turn the hat the right way round and handstitch a button or pompom over the gathered top. Decorate, turn up the brim and go out in the cold!
Stitching tips for an old sweater
• Knits will fray, so always zigzag or overlock the edges.
• Knitted fabric will probably stretch as you sew, so pin securely, use a big stitch and ease the fabric through the machine. Stitch again if you feel it still looks like it may come apart.
• This hat can easily be made by hand, but just remember to use back stitch on the seam and oversew the edges to prevent fraying.
You might also like...
Take an old jumper... and turn it into something gorgeous More ways to upcycle


