

Make a studded 'love' belt
Create this belt from scratch, or just add studs to one already in your wardrobe, with this Valentine's-themed creation from Suzanna Drew-Edwards

Make the entire belt from scratch, following the instructions below, or simply add the word 'love' in rivets - start from 'Studding your belt'.
You will need
● Belt buckle (ours had an inside measurement of 3.5cm)
● Strap of leather which is long enough to fit around the hips and is the same width as the inside measurement of your buckle. We used a soft leather approximately 2mm thick which measured 118cm long by 3.5cm wide
● Tiny piece of leather for the keeper - that little strap of leather that stops the belt end from flapping in an irritating way! Ours measured 12cm by 1cm.
● Rivets. We used four 5mm rivets for securing the buckle in place and a packet of 3mm rivets for studding the belt. Rivets can be bought from good craft shops
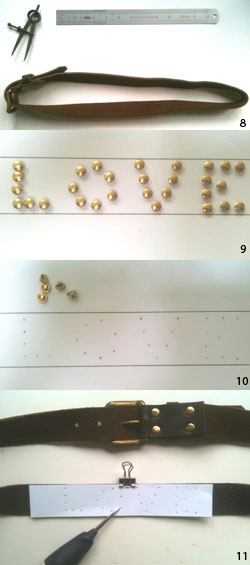
● Rivet pliers (from good craft shops)
● Leather hole punch (from good craft shops)
● Scalpel
● Needle and short length of strong thread
Useful but not essential
● Bulldog clips or clothes pegs
● Gel pen for marking punch holes (you can usually wipe off gel pen with a damp cloth, but please test on a scrap of leather first)
Make your keeper
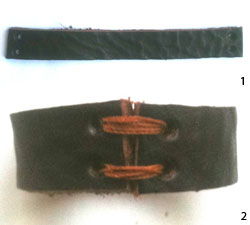
Take your tiny piece of leather (image 1).
Make sure it’s the right length by folding it around the width of your belt strap – you want it loose enough for two thicknesses of your belt strap to fit through.
Make two holes at each end of the strip of leather (image 2) and, with the ends butting up together, handstitch securely.
Cutting the slot for the buckle prong
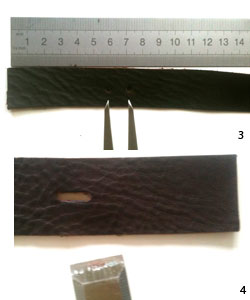
Measure along 6cm from one end of your strap (image 3). Make two marks 1cm apart in the centre of the belt width (ie, one mark at 6cm from and and one mark at 7cm from end).
Punch a hole big enough to fit your buckle prong at each mark.
Then with a scalpel or a sharp chisel, cut between the two holes so that you have a slot (image 4).
Rivet the buckle into place
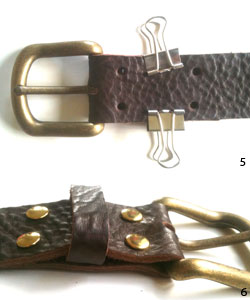
Insert the buckle prong through your slot and fold the end of the belt down. Hold in place with clothes pegs or bulldog clips (image 5). Make two marks 1.5cm below the belt buckle (when riveted, this will hold the buckle in place) and two more 5.5cm below (near the end of the strap). Punch holes at each of these marks.
Place two of the rivets into the two holes nearest the buckle. With your rivet pliers, press so they are securely in place.
Take your keeper and slide over the long end of the belt, pushing it up towards the buckle. You want to place it so that it lies sandwiched by the folded leather at your buckle end. Place the other two rivets in the next two holes and press with your rivet pliers so they are secure (image 6). That’s the trickiest part all done!
Measuring your belt and making the belt holes
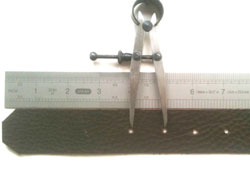
Now your buckle is securely fastened, you can work out where you want the belt to sit when you wear it. Try it on and mark where you want the central hole to be. You will be making 5 holes in total – a central one and two on either side at 2.5cm intervals.
Punch 5 x belt holes big enough for your belt prong to fit through (image 7).
Trim the end of your belt 10cm away from the last (or loosest) hole.
Studding the belt
The hard work’s all done! Now it’s the fun bit.
Do up your belt and fold it in half to find the centre back (image 8). Make a mark with a gel pen or a clip.
Now on a piece of paper, draw two lines the same width as your belt. Using your rivet caps (the ones with the shorter stems), carefully write the word 'love', making sure the caps aren’t too near the edges (image 9).
Press each cap down onto the paper so it makes a mark on the surface (image 10). We used a pencil after we removed the rivet caps, as ours didn’t make a very strong indentation.
With a sharp point (a needle will do), press through your paper template so that you leave small holes in the leather (image 11).
Punch holes in the belt and insert the rivets.
Using your rivet pliers, press each rivet so that it’s securely fastened. And you’re done. You are the proud wearer (or giver) of a fabulous belt!
How to use rivets
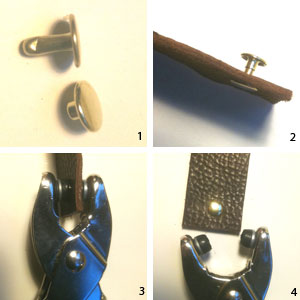
There are lots of different types of rivets. The type we’ve used are called double-ended cap rivets – the cap looks the same on both sides.
The rivet comes in two parts – one side has a longer shaft – this is the bit that goes on the wrong side of your work (image 1). The other side is called the cap – it has a much shorter stem and it fits on top of the shaft like a hat.
After you’ve punched your hole, push the male part (with the long shaft) through the hole from the wrong side (image 2).
Turn your project right side up and place the cap on top. Using your rivet setting pliers, squeeze the rivet closed so it is securely fastened (image 3).
The rivet is in place (image 4).
You might also like...
Make a studded top
Make a heart-shaped leather purse
See all of our love-heart Valentine's Day makes


