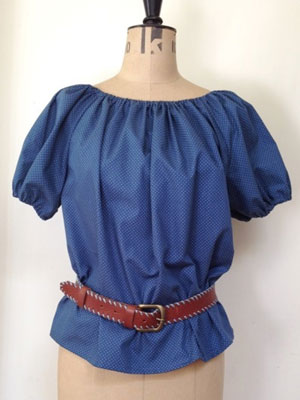
Sew a gathered peasant top: free sewing pattern
We love this cotton top's pretty gathers and puffed sleeves. By Suzanna Drew-Edwards

You will need
● Cotton fabric – the more lightweight the better: we used 1.5 metres but you may need more depending on the length of your blouse
● 1.5m x 5mm-wide elastic
● A broadsheet newspaper and a pen
● A loose-fitting T-shirt to use for working out your armhole shaping

Making the main body pattern piece
This pattern piece is the same for the back and the front, so you need to make only one main body piece.
Take your T-shirt and lay it out flat in front of you. Carefully fold the sleeve underneath as best as you can, so the curve of the armhole seam is visible (image 1). With the sleeve tucked under like this, lay the T-shirt on the top left-hand corner of a piece of newspaper, and roughly draw the curve of the armhole from shoulder seam to armpit.
Now take the T-shirt off the newspaper and draw another line 2cm below the armhole curve. Carefully shape it so that it graduates into the existing line about halfway up (image 2).
Cut the armhole out on this bottom line.
Now work out the width you want the blouse to be (image 3). Measure loosely around your hips – or measure the bottom of another loose-fitting top.
Divide this measurement by two.
Then, because we’re cutting this pattern piece out on the fold – divide this measurement by two again. Add 2cm for seam allowances.
Eg, say your hips measure 110cm. However, you wanted your top to measure 130cm (all the way round) as you wanted it quite baggy. So 130 divided by 2 = 65. 65 divided by 2 = 32.5. 32.5 plus 2 = 34.5cm. So our pattern piece measured 34.5cm.
The length
Decide how long you want your top to be (measure from your armpit to teh desired top length). Add 2cm for the hem.
On your newspaper pattern piece measure down from the armhole seam to the desired length.
Ours measured 32cm + 2cm seam allowance (34cm).
The sleeve pattern piece
Take your back/front pattern piece and lay it on the top left-hand corner of a new piece of newspaper (image 4). Copy the armhole seam onto the new piece of paper.
Now measure along the top from the top of the armhole seam by 16cm – mark it ‘neck’ as this part will form the shoulder section of the neckline.
Measure down by 34cm. This is the length of the sleeve. If you want a longer sleeve, increase this measurement.
The sleeve is cut on the fold so it will be double this width.
Cutting out
Remember to cut the pattern pieces out on the fold of the fabric (image 5). Cut out one back and one front piece. Cut out two sleeves.
Start sewing
Take one of your main body pieces and, with right sides facing and matching armhole seam to armhole seam, pin a sleeve piece to each side (image 6).
Stitch down the armhole seam, 1cm from the edge. Neaten the edges with zigzag or overlock.
Now pin the other main body piece to the sleeves and stitch down the armhole seams. Neaten the edges with zigzag or overlock.
With right sides facing, stitch the sideseams (image 7). At this stage your top will look like a tent. Don’t despair!
Making the neckline casing
Turn under the top edge of your blouse by 0.5cm and again by 1cm – this makes sure all the raw edges are inside (image 8). Press with a hot iron.
Stitch with straight stitch along the edge of your casing – making sure there’s room for your elastic to thread through.
Leave a 1cm gap in your stitching line (this is where you insert the elastic).
Inserting the elastic
Pin a safety pin through one end of your elastic. Insert the safety pin through the gap you left in the casing and thread it (and the elastic) through the casing until you’re back where you started (image 9).
You need to try the blouse on to work out how much elastic you need in order that the neck feels right.
To do this, pin the two ends of the elastic together with a safety pin and try it on. Loosen or tighten the elastic until the neckline feels right on you.
Stitch the elastic together and trim the ends (image 10).
Making the sleeve casings
Using the same method as the neckline, turn the bottom of the sleeves up, leaving a gap in the stitching line for the elastic.
Insert elastic through the gap and try it on to see how loose/tight you want the sleeves to be.
Stitch the elastic together and trim the ends.
Stitching the hem
Turn the bottom of the blouse up twice so the raw edges are all nicely tucked away. Stitch around the hem with straight stitch.
You might also like...
Sew a gathered summer dress: free sewing pattern
Stylish summer knitting patterns
See all of our free sewing patterns for women


