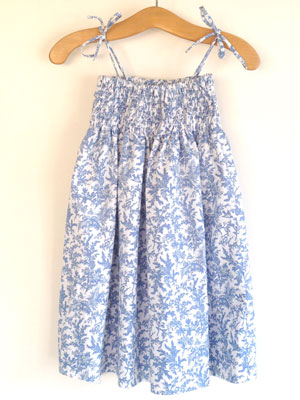
Sew a shirred summer dress: free sewing pattern
Learn how to shir and you’re one step away from a sundress you can wear all summer. We made this for a little girl, but you can easily make it for grown-ups too! By Suzanna Drew-Edwards

You will need
● Tape measure
● Cotton fabric (the size depends on the size of the child) plus a 35 x 35cm square of matching fabric for the straps
● Shirring elastic (available from all haberdashery shops)
● 1cm wide elastic, long enough to comfortably fit the chest measurement of your child
● An iron
Measuring and cutting out your fabric
The chest and length measurements give you the amount of fabric you need. Using thee simple measurements, you can make the dress for a woman, too.
Measure around the chest of your child. Add 3cm for seam allowances. Our measurements totalled 71cm.
Now work out the length. Measure from armpit level down to the desired level of the bottom of the dress and add 6cm for the top and bottom hems. (Ours measured 60cm.)
So we needed two rectangles of fabric, each measuring 71cm wide x 60cm long. These give you the back and the front of your dress. (Basically you’re doubling the total chest measurement in order to get the width of the skirt.)
Start sewing
Take the fabric pieces and place them right sides together. Pin both side seams together. Using straight stitch, sew both seams. Trim to 1cm and neaten the edges with a zigzag stitch. With a hot iron, press these seams flat.

Stitching the elastic casing for the top of the dress
So that our dress has a firm edge at the top, we inserted the 1cm elastic through a casing. To make this, turn the top edge of the fabric over and stitch into place.
At the top of the dress, turn over 5mm of fabric and press flat (image 1). Then turn the top edge over again by 1.5cm and iron flat.
Working with the wrong side of the fabric facing you, stitch around the edge of the casing leaving a 2cm gap at one of the side seams so that you can insert the elastic. (You’ll do this at the end after you’ve shirred the dress.)
Winding the shirring elastic onto the bobbin
If you haven’t used shirring elastic before, don’t panic – it’s not difficult.
First of all, you need to put the elastic onto your sewing machine bobbin (image 1a). You do this by hand – if you do it on the machine, it can wind it too tight. So take your bobbin and wind on the elastic as if you were winding on thread – it’s tempting to stretch it, but don’t!
Insert your bobbin into the bobbin case and place in your machine in the normal way.
With a thread that matches your fabric on the top of the machine, bring through the bobbin elastic by winding the needle down (as normal).
Start shirring
Increase your stitch length; 3.5 – 4 is a good length.
In order to check the tension, it’s sensible to try shirring first on a scrap piece of fabric which is the same weight as the cotton you’re going to use.
If it comes out fairly flat and hasn’t gathered up very much, you may need to change your tension to a higher number (we used a tension set at 5.5 – 6). You want it to look like the sample in image 2.
Begin your shirring just below the casing you made for the elastic, approximately 1.5cm below the top of the dress (image 3).
Tip Secure each row at the beginning and end by doing a couple of reverse stitches – otherwise your elastic may pull out.
To create the elasticated, or shirred, effect, you simply sew rows of straight stitching about 1cm apart all the way around the top of the dress. The elastic in your bobbin will make the fabric gather as you stitch. After you’ve done the first row, you’ll find that you have to gently stretch the fabric out as you go.
Keep going until you have 9 or 10 rows of shirring. The more rows you sew, the tighter the elasticated effect will be.
Remember to put your sewing machine tension back to its normal setting!
Inserting your elastic at the top of the dress
Take your elastic and thread a safety pin into one end (image 4). Find the gap you left in your casing (if you forgot to leave a gap, just unpick a small section) and push the safety pin through the gap. Thread the safety pin with the elastic all the way round the top of the dress until you’re back where you started.
Bring the safety pin through and stitch the two ends together – it should be the same measurement as the shirred panel on the dress (image 5). Any tighter and it may grip and be uncomfortable.
Making the straps
These spaghetti straps (or rouleau straps) are cut on the bias of the fabric so they have a little bit of stretch.
Fold your 35cm square of fabric in half on the diagonal (image 6).
Make a crease along the fold line and open the fabric out again. This line marks the bias of the fabric.
Using this fold line as your guide, cut strips of fabric which are 2cm wide (image 7). You need four of these strips.
Fold each strip in half lengthways and stitch down the length of it. As you reach the end, curve the stitching line into the folded edge about 1cm from the end (image 8) so it is closed.
Turning the straps the right way round
Thread a needle with a long piece of strong cotton and secure it to the closed end of the strap (image 8). Now post the needle through the stitching line into the middle of the strap and carefully work it down so that it comes out of the other end. Pull the needle through.
You may need to gently work the fabric over the lump at the beginning end so that the fabric turns in on itself, but it will do it (image 9).
Repeat with the other three straps. Pin the straps onto the dress and tie them at the shoulder in a knot or a bow. Stitch into place.
With a hot iron, turn up the bottom hem of the dress by 5mm and again by 1.5cm. Stitch into place.
You might also like...
Sew a child's apron
Turn girl's jeans into a skirt
Sew a matching hair scrunchie


