Register with us for competitions, online recipe book and chat


Sew the simplest-ever skirt: free sewing pattern
A drawstring skirt cut on the bias is about the easiest garment you could make. Here's how...
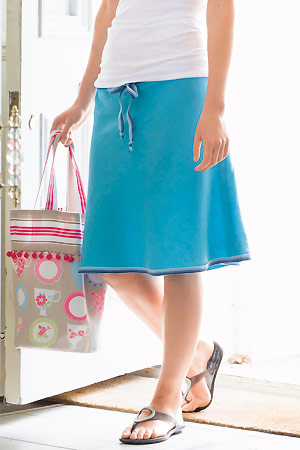
A drawstring skirt cut on the bias is about the easiest garment you could make. The bias cut offers enough stretch to allow it to skim flatteringly over the hips without the need for darts, while the drawstring pulls in the waist and by wearing the skirt low on the hips, you can avoid unflattering gathers. Drawstring skirts are a fashion classic that can be kept up to date by the choice of material and adapting the length to suit the season.
Fit
To fit size small, hips 88cm (34in). Finished garment size at hips 102cm (40in). Take in or widen the pattern at both the centre front and centre back by half the difference between your hip measurement and 88cm (34in). To lengthen, extend the side seam lines and draw a hemline parallel to the one on the pattern
Materials
• 1.5m (13⁄4yd) fabric 115cm (45in) wide or 1.10m (11⁄4yd) fabric 153cm (60in) wide
• 4m (41⁄2yd) narrow braid about 2cm (3⁄4in) wide
• 1m (11⁄4yd) wider braid about 3cm (11⁄4in) wide
• Matching thread
• Dressmaker’s dot-and-cross paper
Cutting out
• Enlarge and make up the pattern piece on page 2 as instructed and cut from dot-and-cross paper
• Fold the fabric in half. Pin the pattern on the fabric with the arrow following the straight grain of the fabric. Cut out one skirt front and one skirt back.
1. Place the front and back pieces of the skirt with right sides together, and pin and then stitch the side seams. Finish the seams with zigzag stitch and then press them open.
2. Allowing for a 1cm (3⁄8in) turn-in at the waist (see step 5), try on the skirt and cut the hem to a little longer than the desired length. Then fold a 12mm (1⁄2in) single hem at the bottom edge to the right side of the skirt, and press.
 3. Starting just beyond one side seam, pin the narrow braid, right side up, to the bottom edge of the skirt, covering the pressed-in hem on the front of the skirt and making sure the edge of the braid aligns with the folded edge of the skirt. When you reach the starting point, cut the braid and turn in the end. Pin the folded end over the other raw end of the braid, aligning it with the side seam of the skirt. Topstitch along the top and bottom edges of the braid to hold it in place
4. Measure out enough of the wide braid to go around the top edge of the skirt to make a waistband, allowing an extra 2.5cm (1in) at each end. Measure out the same amount from the remaining narrow braid. Centre the narrow braid on top of the wide braid and topstitch it in place along both long edges.
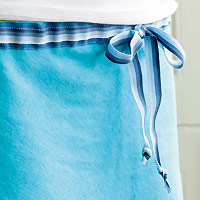
5. On the top edge of the skirt, fold a 12mm (1⁄2in)single hem to the right side, and press. Place a pin in the top edge at the centre front of the skirt. Turn in the end of the braid by 1cm (3⁄8in) and, starting at the centre point, pin the braid in position around the top edge of the skirt, aligning the edges.When you reach the starting point, turn in the other end of the braid by 1cm (3⁄8in). Topstitch along the top and bottom edges of the braid to hold it in place
6. Pin a safety pin onto one end of the remaining narrow braid and thread it through the channel. Tie a knot at both ends of the braid.
 This pattern is taken from 'Sewing Made Simple' by Tessa Evelegh (Jacqui Small, £25).
You might also like...
Sew a camisole to complete your outfit: free pattern
Sew an embellished shopping bag
See all of our free sewing patterns for women


Post your comment
Join us here...


Click on a magazine title to see all its
online features and news

Stain buster
Our guide to removing smudges, spots, and other spills.
See more stain busting solutions >
Community
Forums
View all forums
Blogs
View all blogs-
 The five best things I tried this month
Posted by 11280Adrienne Wyper
-
 Learning Italian - è fantastico!
Posted by 11320Carol Muskoron
MORE FROM ALLABOUTYOU
View by magazine :
Contact | About Us | Privacy | Complaints | Terms & Conditions | Cookie Policy | Advertising | Site Map| Popular Forum Threads
© Hearst Magazines UK is the trading name of The National Magazine Company Ltd, 72 Broadwick Street, London, W1F 9EP. Registered in England 112955. All rights reserved.
All About You, Part of the Hearst UK fashion and beauty network © Copyright 2024