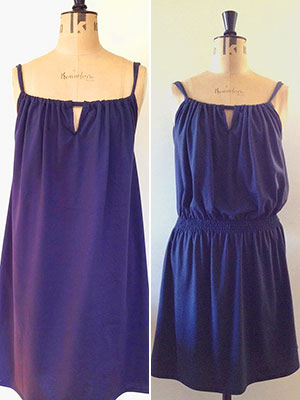
Sew an easy gathered summer dress: free sewing pattern
Choose from two designs and follow our easy sewing instructions to make a stylish dress that's perfect for summer. By Suzanna Drew-Edwards

You need
● Cotton jersey – or a fabric that drapes well – we used 1.25 metres but you may need more depending on the length.
● Elastic or shirring elastic (if you opt for the waisted version)
● Matching thread
The measurements
The width: Our dress fitted a size 12. For other sizes, add (or subtract) 5cm per size to the width. For example, for a size 14, add 5cm to the width measurement; for a size 10, subtract 5cm from the width measurement.
The length:
Our dress measured 84cm, but you can choose the dress length you want. Simply measure from your armpit to the desired dress length. Add 6cm for top and bottom hem allowances.

Cutting out
Cut out a rectangle measuring 66cm wide by 84cm long for the front.
Cut out a rectangle measuring 58cm wide by 84cm long for the back. The back is a little narrower than the front as otherwise it bags around the bum area.
Cut out a strip of fabric measuring 6cm x 130cm for the strap.
Cut out the keyhole binding 4cm x 27cm.
The V opening on the centre front
If you don’t want a front V opening just miss this stage out.
Take the wider rectangle of fabric.
Image 1: Fold it in half and at the top centre front, cut a 10cm slit vertically down. This is the beginning of your V-shaped opening.
Image 2: Now take your binding strip (the smaller strip) and with right sides together, lay it on top of one side of the slit. Pin down matching the raw edges of the slit and the strip.
Image 3: Open out the slit so it forms a (kind of) straight line and pin on the binding strip to the other half, matching raw edges.
Image 4: Stitch 0.5cm from the raw edge – making sure that you catch in both edges of the fabric – especially at the bottom of the V shape.
Image 5: With right side facing up, carefully and evenly fold the binding strip round to the back and pin into place. Put the pins on the right side of the fabric.
Image 6: From the right side, stitch the binding strip into place – running the line of stitches down the gutter of the seam. Trim any excess fabric at the back.
Making the casing for the straps.
Image 7: Take your dress front, and on either side of the V opening, turn down 3-4cm. Tuck the raw edges in by 1cm. Pin and stitch into place along the folded in edge – backstitching at the beginning and end to secure.
Repeat with the top edge of your dress back.
The straps
Images 8 and 9: Take your long strip of fabric and with right sides together, fold in half lengthways.
Stitch 1cm from the raw edge, leaving the ends open and back stitching at the beginning and end to secure.
Pin a safety pin through the edge of one end and thread it back through the strip, bringing it out at the other end so the strip turns the right way round.
The side seams
With the wrong side facing up, lay your dress front out on a flat surface. On each side seam, measure down 12cm from the top edge and mark with a pin or some tailor's chalk.
Now, place the back and front together (with right sides matching) and starting from the mark you’ve just made, pin the side seams together.
You want to start from this point as this forms the armhole of the dress.
Image 10: Turn under the edges of the ‘armhole’ by 0.5cm. Pin and topstitch into place.
Inserting the straps
Image 11: Take your long strap and put a safety pin into one end. Starting at a side seam, insert the safety pin into your top casing and pull the strap all the way round the casing until you’re back where you started.
Manipulate the straps so that you have a shoulder strap at each side seam.
Pin or tie the ends of the straps together and try the dress on – this is the only way of working out how long you want the straps to be. If the dress feels too tight at the armpit, lengthen the straps or unpick a little bit of the side seam on each side.
When you have the shoulder straps at the right length, stitch the straps together.
And you’re finished. Enjoy the sun!
Giving the dress an elasticated waist
if you want to bring the dress in at the waist as we have done, measure some elastic to your waist size, try the dress on and mark on it where your waist is. Working from the wrong side, Pin the elastic on and sew it to the dress, stretching the elastic as you stitch.
Alternatively, you can shir the dress using shirring elastic. We did it with four rows of shirring. See more on how to shir.
You might also like...
Sew a shirred summer dress
Sew the simplest-ever skirt
See all of our free sewing patterns for women


