Sew a rock n’ roll frilly apron: free sewing pattern
Cheer up your kitchen duties and release your inner domestic goddess with this frou-frou waist-tying apron.
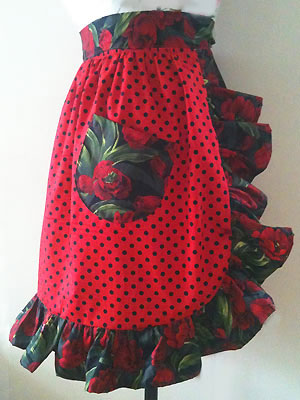
This makes an apron measuring 47cm in length and 72cm width at its widest point.
You will need:
● 1 metre cotton fabric for the main apron.
● 1 metre contrasting fabric for the frill, waistband/ties, and pocket.
We used a dressmaking cotton of 114cm width.
Cutting out
Main apron: Cut 2 x rectangles measuring 66cm width x 40cm length. With scissors, round off the bottom two corners of each main apron rectangle.
Frill: Cut out 3 x strips measuring 12cm x the width of the fabric (ie. from selvedge to selvedge).
Waistband: Cut out 12cm x 150cm (our fabric wasn’t wide enough so we joined some pieces together to get the length we needed).
Pocket: Cut a rectangle measuring 20cm x 17cm. Round off the bottom two corners.
Start stitching
 The frill: Take the 3 frill strips and, with right sides together, stitch the short edges together so they form one long strip. Iron seams flat. With a hot iron, turn in one raw edge of your long frill strip by 0.5cm and press flat. Then turn the same edge over again by 1cm (so all raw edges are hidden) and press flat. Stitch with straight stitch. (Image 1)
Inserting gathering stitches: A gathering stitch is a big (size 4) stitching line 1cm from the raw edge which enables you to gather the fabric along the length of the thread.
Gather the frill: on the unfinished raw edge of your frill piece, stitch a line 1cm from the edge all the way along.
Gather the top of the main apron: on both apron pieces, run a gathering stitch along the top edge.
Gather the pocket: run a gathering thread from the top left hand corner round the curved bottom, and stop stitching at the top right hand corner.
Sewing the pocket: Gently pull one of the ends of the gathering thread and work the fabric along so the rounded corners curl in and the raw edges tuck themselves in on the wrong side of the fabric. You want the straight edges to lie flat (ie, no gathers). Press with a hot iron. (Image 2)
Fold over the top edge by 1cm. Press. Turn over the edge again hiding all the raw edges. Press. Stitch the top pocket edge with a straight stitch. (Image 3)
Position pocket onto apron body and pin into place 12cm from top edge and 12cm in from the side. We put ours at a jaunty angle, but you can have it straight if you prefer. Stitch 0.25cm from the pocket edges and back stitch at the top corners to lock into position. (Image 4)
Attaching and gathering the frill: Take each short edge of your frill piece and place the short ends together. Mark the centre point with a pin. Take the apron piece with the pocket and fold in half. Mark the centre point on the bottom edge. With right sides together, pin the frill onto the apron piece, matching top edges and halfway points. Take hold of one of the frill’s gathering threads and gently begin to move the fabric along the thread so the material gathers up and begins to fit the apron. Keep doing this until the length of the frill matches the side and bottom edges of the apron. Pin into place. (Image 5)
With the frill sandwiched inside, pin the other main apron piece (with right sides down) onto the frill/apron. (Image 6) Stitch into place 1cm away from the edge and then turn the right way out.
Gathering the top of the apron.
Using the same method as above, gather the top of both apron pieces so they measure 40cm.
Attaching the waistband
Fold your waistband piece in half and find the centre point. Mark with a pin. With a hot iron, press in the top and bottom edge by 1cm. Then fold waistband in half all the way along its length and press.
Find the centre of the top of your main apron by folding in half. Mark with a pin. With right sides together, pin the centre waistband to the centre top of your apron. Pin into place and stitch 1cm away from the edge. (Image 7)
Press the seam upwards with a hot iron (image 8). Fold the waistband over to the wrong side of the apron and top stitch into place so all the raw edges are tucked inside. Neaten the ends.
Try it on and release your inner domestic goddess!
You might also like...
See all of our free apron sewing patterns
Sew smart oven gloves
Get crafty in the kitchen: more ideas to add an individual homemade touch


