Sew a faux fur clutch bag: free sewing pattern
Make our lined fluffy clutch bag - you'll be bang on trend. By Suzanna Drew-Edwards
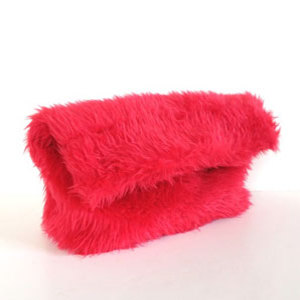
This makes a bag measuring 36cm wide at the top by 30cm deep (unfolded).
You will need
● Faux fur for the main bag body: two rectangles measuring 38cm x 43cm
● Lining fabric – 2 rectangles measuring 38cm long by 34cm wide
● Heavyweight interfacing – 2 x small 3cm square pieces
● Magnetic snap
Mark the position of the magnetic snap
Lay your main fake fur bag pieces wrong sides up on a flat surface.
On each bag piece, measure 4cm down from the top and 20cm in from each side (so you’re in the middle and 4cm down).
Put a pin in the fabric or make a mark.
Now take your small squares of interfacing and find the middle of each one (image 1). Mark it by pushing a pin through the centre from right side to wrong side. Place this piece of interfacing on top of your mark on your faux fur, matching the two points. It helps if you push the pin in the interfacing through the mark on the fur – then you know you’ve got it right.

Iron on the interfacing
Put a clean cloth over the interfacing/fake fur and very carefully, with the tip of a not-too-hot iron, (fake fur does not like heat), iron on your interfacing.
Mark the magnetic snap location
You’ll see each side of the magnetic snap has a backing plate with two slots in it.
Place one backing plate on top of your interfacing – so the central hole of the backing plate is over your mark on the interfacing.
With a biro, mark the interfacing through the slots so you have two little lines (image 2).
Repeat on the other side.
Insert the snap
The magnetic snap has two arms which need to go through the fabric (where you marked it) and through the backing plate. The arms are then bent over the backing plate so it sits firmly in place.
So - very carefully, slit the fabric along the two marks you made through the backing plate. Working from the right side of your fur fabric, feel where the slits are and post the snap’s arms through the fabric and through the backing plate (image 3). Then bend the arms over the backing plate. (We used a metal ruler to do this as they can be quite stiff.)
Repeat this process on the other side (image 4).
Sew the lining to the bag body
Take one piece of lining and one furry bag body piece.
With right sides together, pin the top of the furry piece to the top of the lining piece.
With straight stitch, sew along 1cm from the raw edge.
Repeat with the other piece of lining and the other fur side (image 5).
Sew the bag together
Place the two bag bodies right sides together.
Pin the edges (make sure the seam lines of the lining fabric and the fur fabric match) and straight stitch 1cm from the raw edge all the way around, leaving a 10cm gap in the lining. (We think it’s best to leave the gap in the base of the lining, image 6).
Square (or box) off the corners
This is where you create a flat bottom for your bag.
With your bag still inside out – take hold of the tip of one of the bottom corners and fold it so the side and bottom seams meet together – it will form a triangle (image 7). Pin it together and stitch across, backstitching at each edge.
The bigger the triangle, the wider the base of your bag will be. Our seam across this part measured 10cm which gave our bag a 10cm wide base.
Trim 1cm from the edge. Repeat with the other bag corner and with the corners of the lining piece (image 8).
Bag it out
Post your hand through the hole you left in the lining and grab the base of the fake fur bag from inside. Gradually pull it through the lining hole until the bag is the right way round (all the seams on the inside).
Finish it off
Push the lining down inside the the bag so the lining/fur seam is about 4-5cm below the top edge.
With the bag inside out, stitch around the gutter of the seam where the lining and fur meet. This will hold the top of the bag in place. You can hide this stitching line by brushing free the fur that’s been caught in the stitches.
Stitch up the hole in the lining (image 9).
You might also like...
Sew a faux-leather foldover clutch bag: free sewing pattern
Sew a velvet clutch bag: free sewing pattern
Sew a faux-fur stole: free sewing pattern
See all of our bags to sew and knit: free patterns


