Make a drawstring bucket bag
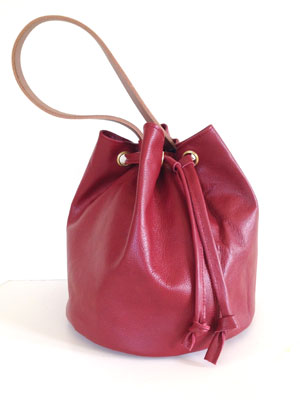
This simple shoulder bag is made out of pleather and has a handy pocket inside, and makes a great addition to your accessories wardrobe. By Suzanna Drew-Edwards

You will need
● Bag outer: 50cm of pleather or heavyweight fabric (eg denim, canvas, ticking)
● Bag lining: 50cm of cotton lining fabric
● Heavyweight interfacing: optional, useful to put on the base if your fabric needs a bit more weight
● Strap: leather or mock leather strap measuring 53cm x 2.5cm, such as a secondhand belt from a charity shop
● Eyelets and eyelet setter: these come as kits from good haberdashery shops
● Rivets and rivet setter for attaching the handle: optional, available as a kit from good haberdashery shops – you need these if your handle is too thick to stitch on with a sewing machine
Cutting out
For the main bag body: cut out a large rectangle measuring 78cm x 30cm and a circle with a 25cm diameter
For the bag lining: cut out a large rectangle measuring 78cm x 23cm and a circle with a 25cm diameter
For the drawstring, cut out a strip of outer fabric measuring 78cm x 3cm
For the drawstring toggle: Out of your scraps, cut a small strip of pleather measuring 7cm x 1.5cm
For the pocket: cut out a rectangle measuring 12cm deep x 14cm wide (a cd cover makes a good template)
For the interfacing: a circle with a 25cm diameter
Starting the main bag
If you’re using interfacing on your bag base, iron it on now. (If you’re using pleather, remember to use sew-in interfacing as the iron may melt the fabric.)
Take your main bag body piece and fold it in half lengthways so that the two short edges are together. Stitch a seam down the short edges 1.5cm from the raw edge.
Now take your bag base and, right sides matching, pin it to one end of your stitched bag body. Stitch 0.5cm from the raw edge, stretching and easing the fabric to fit.

Starting the lining
Take your main lining piece (the rectangle) and fold it in half lengthways to find the centre.
Centralise your pocket piece over the fold line and 4cm down from the top edge of your bag body lining. Stitch into place, reinforcing the top corners by backstitching (image 1).
Now place the two short ends of your rectangle together (right sides facing) and stitch a seam 1.5cm from the raw edge (image 2). You need to leave a 10cm gap in the middle of this seam, so either leave a gap while you stitch, or alternatively, you could stitch all the way down the short edge and unpick a gap in the middle of the seam afterwards.
Stitching on the lining base
Pin your lining bag base to the bottom end of your lining tube (remember to check which way your pocket opening is) and stitch into place 0.5cm from the raw edge, stretching and easing the fabric to fit.
Stitching the outer to the inner
You now have two ‘bags’ (image 3): one of pleather and one of lining.
Turn the pleather bag the right way round and keep the lining bag inside out.
Insert the pleather bag into the lining bag, placing the two side seams together.
Matching raw edges, stitch all the way round the top of the lining and outer bag 0.5 to 1cm from the top edge (image 4).
Turning the bag the right way round
Remember that hole you made in the lining side seam? Now’s the time to use it!
Put your hand through the hole, grab the outer bag and start easing all the fabric through the hole (image 5).
You will now have a bag like this – with all the seams on the inside (image 6).
Push the lining down inside the bag (image 7). Because your lining piece was shorter than your main bag body, the top edge of your outer bag will be turned inside by approximately 4 to 5cm. Top stitch 0.5cm from the top edge to hold everything in place.
Inserting the holes
You need eight holes around the top of your bag (image 8).
Using your seam as the centre front of the bag, measure two points 4.5cm on each side of the seam and another six at equal measurements all around the bag (ours were about 9.5cm away from each other but do use a ruler to check yours are equal).
With your eyelet setting kit, use the hole punch that comes with it to make eight holes at the points you marked.
Insert eyelets following the instructions on your kit.
Making the drawstring
Take your long strip and fold it in half lengthways. Carefully straight-stitch right the way down the strip, matching raw edges as you go.
Making the drawstring toggle
Take the small strip of pleather and fold both ends in so they meet in the middle and then fold it in half again like a folded book. This will give you four layers (image 9).
Very carefully stitch down the ‘spine’ so that all the layers are held in place (image 10). When you open it out, you will see you can slip the ends of the drawstring through the loops.
Thread the drawstring through the eyelets and slip your toggle onto the ends – when you push the toggle up, this will hold the bag closed. Tie big knots at the ends of your drawstring.
Attaching the strap
You can either stitch the strap on to the sides of the bag (if it’s not too thick to go through your machine) or you can attach it with rivets.
If you use rivets, you need to make two holes in each end of your strap. A hole punch piece should be included in your rivet set (image 11).
Make another two holes in equal places on either side of the bag (image 12).
Using your rivet setter, secure the handle into place.
You might also like...
Sew a simple drawstring gym bag
Like rivets? Make a studded belt
See all of our bags to sew and knit: free patterns


