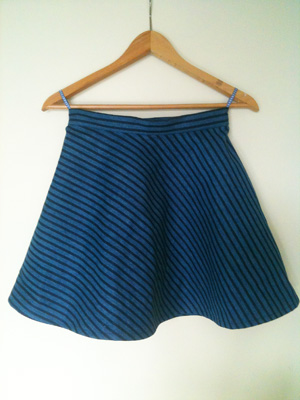
Sew a stylish skater skirt: free sewing pattern
Go for the latest skirt shape with this figure-flattering skater style

For the pattern, you’ll need…
● Your body
● tape measure
● big piece of newspaper (or two)
● marker pen
● pair of scissors
For the skirt, you’ll need…
● Your pattern
● An 8cm zip
● 1m of fabric
● Iron-on interfacing (for the waistband)
● A popper – or a hook and eye
Measuring
You need to measure two things:
a) your waist measurement (or the circumference)
b) the length of your finished skirt
To make the pattern you need to find the radius of your waist measurement (or circumference). Don’t worry, it’s easy!
Take your waist measurement (or circumference) and multiply it by 2. Then divide this number by 6.28. The resulting figure is your radius. Write it down, you’re going to need it!
For example: the waist measurement we used is 68.5cm. So 68.5 x 2 is 137. 137 divided by 6.28 is 21.8 – so our radius is 21.8cm
Now subtract 1cm from this for seam allowances – otherwise your skirt waist may be too big. This means our radius is 20.8cm (although for easy measuring we rounded it up to 21cm).
Making the pattern

Take your sheet of paper and mark the top left hand corner mark with an A. (Image 1)
From point A, measure 21cm along the top edge of the paper – and down the left hand side of the paper – this gives you points B and C.
Now you need to join up points B and C. From A, measure 21cm inwards in an arc from the corner so that you have a row of dots forming a curved line between B and C. Draw a line joining up your measured points. This is the waistline of your skirt.
Drawing in the hemline
Take your skirt length measurement (ours was 41cm) and add 1.5cm for a small hem (42.5cm). Measure down the resulting amount from your waistline and mark with dots. Join up the dots and you have a hemline.
Cut out. This pattern is one half of your skater skirt.
The waistband pattern: Decide how wide you want your waistband to be and double that figure. Add 3cm for seam allowances. That’s the width. For the length, take your waistband measurement and add 6cm for seam allowances and overlap where the waistband meets.
For example : we wanted our waistband to have a width of 3.5cm. 2 x 3.5 = 7cm plus 3cm seam allowances = 10cm.
So our waistband measures 74.5cm x 10cm.
Start cutting out your fabric
Cut out two skirt pieces and one waistband from your fabric.
Cut out a waistband in iron-on interfacing (ideally you want to cut the interfacing so that it’s 1cm smaller all the way around.
Start sewing
Stay-stitch (this is a line of stitching 1cm away from the raw edge - which stops the fabric stretching out of shape) along the waistband edge of your skirt back and skirt front.
Finish the raw edges – in order to stop fraying, run a zig-zag stitch all the way around the raw edges of both skirt pieces.
Stitching the side seams
Lay the skirt front and skirt back right sides together.
Pin all the way up one side seam. On the other side seam, pin raw edges together, but stop 7cm from the top - this is where you insert the zip (image 2).
Straight-stitch 1.5 cm from the edge along both seams. Press seams flat with a hot iron.
Check the fit
With the skirt inside out, try it on for size. This is to make sure the waist fits you. You’ll have to pretend the zip is in place, so pinch the top of the open seam together. You don’t want it really tight (as you’ll have the waistband seam which will add bulk), but you want it so it’s not too loose. If it needs altering, this is the time to do it.
Inserting the zip
Attach the zip foot to your machine.
With the skirt inside out, lay the zip right side down (the side with the slider) onto your open side seam. Pin into place (image 3). The top of the zip tape needs to be level with the top raw edge of your skirt. Stitch 0.5cm from the raw edge down both sides of the zip tape.
Turn the skirt the right way round and press the seams flat with a hot iron.
Topstitch so that the seam stays in place (image 4).
Attaching the waistband
Turn the skirt the right way round.
With right sides together, pin the waistband to the top of the skirt, matching top raw edges and making sure the waistband ends protrude beyond the edge of the skirt waist (image 5).
Stitch into place.
With right sides together, double the waistband back on itself. Pin and stitch at the ends and trim the seam allowance (images 6 and 7).
Turn the waistband the right way round, poking out the corners with a knitting needle.
Turn the raw edge under on the inside waist and stitch into place.
Handsew a hook-and-eye or a popper onto the top of the waistband.
Stitching the hem
Turn the hem up by 1cm and stitch with straight stitch.
It’s finished - try it on with a twirl!
You might also like...
Sew the simplest-ever skirt
Sew a jersey tunic top
See all of our free sewing patterns for women


