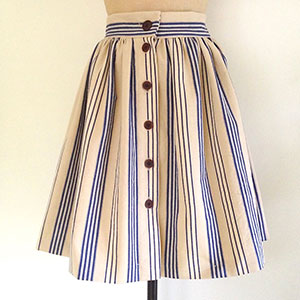
Make a button-through skirt: free sewing pattern
This stylish skirt with front button detailing is perfect for the midi skirt trend - just follow our easy instructions to make. By Suzanna Drew-Edwards

You will need...
● Heavyweight cotton fabric – we used 1.25 metres but you may need more depending on the length of your skirt
● 25cm medium-weight interfacing
● 6 buttons
● templates - click here for the templates, on page 2
Taking the measurements
Do this first as it will help you work out how much fabric you need to buy.
You need three measurements:
Hips (to find the hips, measure 16cm down from the waistline)
Waist
Length (for this, measure down from the waist to where you’d like the skirt to finish)
The measurements we worked with were:
Waist: 66cm
Hip: 94cm
Length: 55cm
Working out the width and length of the skirt back, fronts and waistband
The skirt is made up of four very simple pieces. (Click here for the template)
• 1 x rectangle for the back
• 2 x rectangles for the fronts
• 1 x long strip for the waistband
The length
Take your length measurement and add 6cm (for seam allowance and bottom hem).
For ours - the length was 55cm plus 6cm - totalling 61cm.
The back skirt
For the width of the back skirt section, take your hip measurement and add 10cm (for a bit of added flounce) plus 3cm (for seam allowances)
So for ours – this was 94cm plus 10cm plus 3cm = 107cm
Our back skirt section measured 107cm wide x 61cm long.
The front skirt
Your front skirt needs to be a 12cm wider than your back skirt to allow for the plackets at the front where the skirt is buttoned up.
So – add 12cm to your back skirt width (in our case this meant our skirt width was 119cm) and keep the same length (61cm in our case).
When you’ve cut this rectangle, fold it in half so the short ends are placed together, and cut down the fold line.
This gives you the two halves of your front skirt.
The waistband
Take your waist measurement and add 7cm for seam allowances and the overlap at the front.
The height of the waistband is 15cm.
Our waistband strip measured 72cm long x 15cm high.
Interfacing
You need to cut 3 strips of interfacing: 2 for the centre front edges (the plackets) where your buttons and buttonholes go – and 1 for the waistband.
Placket interfacing: 5cm wide x length of skirt.
Waistband interfacing: the same as your waistband.

Stitching the plackets on the skirt fronts
Image 2: Take both your skirt fronts and fold in the centre front edges of each one by 1cm. Press with a hot iron.
Lay your interfacing strips against the folded in edge of each skirt front piece and iron into place.
Image 3: Fold each centre front in by 4.5-5cm and press with a hot iron. Stitch into place with a straight stitch.
Stitch the side seams
With right sides together pin the skirt fronts to the skirt back at the side seams.
Stitch 1.5cm from the edge, back stitching at each end of the seam.
Gathering the skirt top
Image 4: A gathering stitch is the biggest stitch your machine can do (usually a 4).
So change your stitch length and starting from your folded over centre front, stitch all the way round, 1cm down from the top edge. Don’t backstitch.
Then do a second line of stitching 1cm below the first.
Now take hold of the two top threads (not the top and the bottom – it won’t work) and holding them gently but firmly, carefully work the fabric so it gathers up along the threads.
Work your way along until the top of the skirt measures your waist measurement plus 4cm.
Don't break a thread otherwise you’ll have to start again.
When you’ve done that, change your stitch length back to normal – and carefully stitch around over the gathers. This will hold them in place.
Attaching the waistband
Iron the waistband interfacing onto the wrong side of the waistband.
Image 5: With right sides matching and the ends overhanging the skirt by 1.5cm, place the waistband on to the gathered edge of your skirt.
Pin into place and straight stitch all the way round 1.5cm from the top. Go slowly as there will be a lot of fabric for the machine to negotiate.
Image 6: Fold in the long edge at the top of the waistband by 1cm. Press with a hot iron.
Image 7: Place the skirt flat on a table with the fabric right side up. Now fold the waistband in half so the pressed edge is level with the stitched edge.
Image 8: At each end, pin into place and stitch vertically in line with the centre front of the skirt, backstitching at the beginning and end.
Image 9: Trim the excess from the seam and turn the waistband the right way round.
Carefully pin the back of the waistband so that it lies just below the waistband/skirt seam.
Now, working from the front of the skirt, stitch in the ‘gutter’ of the seam so that the back of the waistband is caught in by the stitching.
Stitching the hem
Image 10: Try the skirt on and work out the correct length. You may need to trim some excess fabric. Our hem was approximately 4cm which allowed us to turn over the raw edge and stitch along. If you don’t have enough hem allowance, use a zigzag stitch to neaten off the edge instead and then turn it up.
Stitching the buttonholes and the buttons
Image 11: With pins or chalk work out where you want your button holes to go. We used one big button on the waistband, and 5 slightly smaller buttons on the main skirt.
The gap between the buttonholes on the main skirt was 6cm.
Do your buttonholes first (make sure they’re big enough for the buttons to go through!) and then handstitch on the buttons.
You might also like...
Sew a pin-tucked camisole
Sew the simplest ever skirt
See all our gorgeous fashion makes for women


