Make a baby’s summer hat: free sewing pattern
Follow our easy sewing instructions to make an adorable baby's summer hat with a reversible design. By Suzanna Drew-Edwards
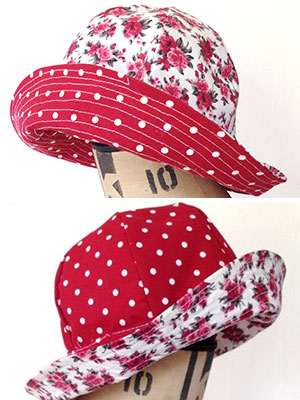
This hat will fit a baby aged between 12 and 24 months – for smaller heads print out the pattern on a smaller scale.
You will need
● Outer hat: 0.25 metre cotton fabric
● Lining: 0.25 metre cotton fabric
● Interfacing for the brim
● Pattern template - click here for your printable template
Cutting out
Image 1: For the outer: cut six crown segments and two brim pieces (the brim pieces you cut on the fold).
For the lining: cut six crown segments and two brim pieces (the brim pieces you cut on the fold).
Interfacing: cut two brim pieces and iron on to the wrong side of the outer hat brim pieces.
Stitching the crown of the hat
 You need to make the crown of the hat in two halves, each made up of three crown segments.
To do this...
Image 2: Take two outer hat segments and lay them on top of each other, right sides together.
Pin down one side and straight stitch 1cm from the raw edge, backstitching at the top and bottom to secure.
Image 3: With the stitched segments right side up, lay another segment on top (so the right side of the fabric faces the right side of your stitched segments).
Matching the tip of the segment and the bottom corner, pin and straight stitch down the edge. When you open it out you will have half a hat.
Repeat with the remaining three outer segments so that you have two halves.
Image 4: Now join the two hat halves. Place them right sides together. Pin and stitch around 1cm from the edge.
Repeat with the six lining crown pieces so that you end up with two hat crowns – one in your outer fabric and one in your lining.
Trim all the seams so they are approximately 0.5cm.
Image 5: Turn your outer crown the right way round and place over your inside-out lining crown.
Image 6: Match up the raw edges and secure together with a seam 0.5cm from the edge.
Press with a hot iron.
The brim
Image 7: Take your outer brim pieces and place them on top of each other right sides facing. Pin the two straight edges, and stitch together 1cm from the edge.
Repeat with the brim pieces for the lining.
Image 8: Trim the seams to 0.5cm.
Image 9: Take your two brim pieces and lay them on top of each other matching the side seams and with right sides facing. Pin around the outside and stitch with a seam 1cm from the edge.
Trim the seam.
Image 10: Open your brim out so it looks like the Image 10. Place it so your outer brim is on the top and your lining brim is on the bottom half.
Image 10a: Take the crown of the hat (making sure your outer fabric is on the outside and your lining fabric is inside) and drop it into the middle of your brim – a bit like dropping an egg into an eggcup. You want it so that your outer crown fabric is facing your outer brim fabric.
Pin all the layers together (you should have 3 layers – the crown lining and outer fabric and the outer brim).
Image 11: Stitch 1cm from the edge and trim the seam.
Finishing off the brim
Image 12: Put your hat on the ironing board with the lining brim pulled out so you can get at it. With a hot iron, press under the raw edge of the lining brim by 0.5 to 1cm.
Image 13: On the inside, carefully pin this ironed edge just over the seam where the crown is stitched to the brim.
Handstitch into place – or carefully machine stitch so that all the folded over edge is caught in.
Topstitching the brim (optional)
Machine stitch around the outside edge of the brim 0.5cm from the edge.
We carried on stitching around in a circle as we liked the stitching – but this is entirely up to you!
You might also like...
Knit a rabbit hat for a baby
New baby ideas: cards and gifts to make
Toys to sew, knit and crochet: free patterns


