Sew an Indian elephant soft toy
Make an embroidered elephant
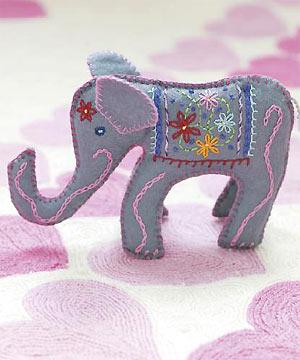
This is a good project for novice embroiderers: there isn't a lot to do, the stitches are simple, and if you make a mistake you can unpick the stitches and the felt won't show the marks.
Materials
● Paper for templates
● Two 20 x 13 cm (8 x 5 in), two 5 x 4 cm (2 x 11/2 in) and two 7 x 11 cm (23/4 x 41/2 in) pieces of grey felt
● Selection of stranded embroidery threads
● Two 7 x 11 cm (23/4 in x 41/2 in) pieces of medium-weight iron-on interfacing
● Grey sewing thread
● Toy stuffing
Equipment
● Elephant templates - Click here to download the templates
● Paper scissors
● Fading fabric marker
● Fabric scissors
● Embroidery and hand-sewing needles
● Pins
● Iron
1 Photocopy the templates at 140 per cent onto a piece of paper and cut them out. Using the fabric marker, draw around the body onto the two largest pieces of felt and draw around the ears onto the two 5 x 4 cm (2 x 11/2 in) pieces of grey felt. Cut out all of the shapes.
2 Using the embroidery needle and two strands of embroidery thread, work blanket stitch around the curved edge of the ear. Start at the top of the straight section and do not finish the thread when you reach the end of the curve. Pin the ear in position on the head following the placement mark on the body template and continue the blanket stitch across the straight section of the ear, sewing it to the body piece. Secure the thread on the back. Repeat with the second ear, making sure you flip the body piece so that you have both a left- and a right-hand side of the elephant.
3 Using the photograph as a guide, embroider the elephant's body pieces. You can make both sides the same, or different as here. Use three strands of embroidery thread throughout. Blanket stitch and chain stitch work well for outlining the blanket on the elephant's back. Fill in the blanket with lazy-daisy flowers linked with lines of backstitch. Use French knots for the flower centres. Embroider a flower on the elephant's forehead and one or two on the trunk. Work lines of chain stitch down the trunk and legs, with individual lazy daisy stitches for toes. Use a circle of chain stitch with a French knot in the middle to make the eyes.
4 Cut along the dotted line on the template to cut out the leg gusset. Iron iron-on interfacing following the manufacturer's instructions onto the two remaining pieces of felt. Draw around the gusset onto the felt, remembering to flip the template over after drawing around it the first time to make left and right-hand pieces. Right sides facing, pin the gusset pieces together along the straight edge and, using the hand-sewing needle and grey sewing thread, oversew them together.
5 Wrong sides facing, pin the embroidered body pieces together. Using the embroidery needle, three strands of embroidery thread and starting in the crook of the neck, work blanket stitch along the underside of the trunk. Continue along the top of the trunk, stuffing it as you go.
6 Stitch over the back of the elephant to the tail point marked on the template. Plait or coil a short length of embroidery thread and knot both ends. Trim one end to make a short tassel. Slip the other end into the body of the elephant and continue the blanket stitch, securing the tail in place. Stitch to the point where the gusset starts, as shown on the template, but do not cut the thread.
7 Wrong sides facing, pin the gusset into position between the legs of the embroidered body pieces. Match the front and back legs on the bodies and gusset. Continue the blanket stitch down one back leg. Stitch across the foot and up the other side of the leg, stuffing it as you go. Stitch across the tummy, down the front leg and up the other side, again stuffing the leg as you go.When you reach the crook of the neck, secure the thread.
8 Go back to the tail and continue the blanket stitch to attach the other side of the gusset to the second embroidered body. Sew and stuff in the same way, but stuff the body and head as well. Finish the stitching in the crook of the neck.

This pattern is taken from 'Stitched Toys' by Kate Haxell (Hamlyn, £14.99).
You might also like...
Click here for more toys to knit, sew and crochet
Post your comment
Join us here...
Community
Forums
View all forums
Blogs
View all blogs-
 The five best things I tried this month
Posted by 11280Adrienne Wyper
-
 Learning Italian - è fantastico!
Posted by 11320Carol Muskoron


