Register with us for competitions, online recipe book and chat


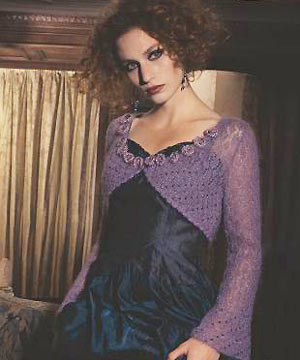
Knit a beaded long-sleeved shrug: free pattern
Free pattern for a pretty glittery beaded shrug, with crochet flowers, featured in Prima January 2007
Measurements
Sizes 8(10:12:14:16:18:20:22); to fit bust 82(87:92:97:102:107:112:117)cm; actual measurements 85(88:92:97:105:110:115:123)cm; length 33(33:33:36:36:38:38:40)cm.
Materials
Yarn
Rowan Kidsilk Night Fountain 612 (A) - 4(4:4:5:5:5:6:6) 25g balls.
Rowan Lurex Shimmer Gleam 336 (B) - 1 x 25g ball.
1 pair 3¾mm needles.
2.00mm crochet hook.
4.00mm crochet hook.
Beads
13 large fancy beads * Ref Bali Silver Bead B524, and approx 380(390: 400:420:440:460:480:500) each of small clear beads * Ref Glass Bead GB7 col. 10 grey and dark faceted beads * Ref Glass Bead GB7 col. 3 Gunmetal; all from Creative Bead Craft Ltd (01494 778818).
Contact 01484 681881 for stockists of Rowan yarns and books.
Tension
22 sts and 30 rows to 10cm measured over st-st using 3¾mm needles and yarn A.
Abbreviations
alt = alternate; beg = beginning; ch = chain; cm = centimetres; cont = continue; dc = double crochet; dec = decrease; foll(s) = follow(s)ing; inc = increase; k = knit; p = purl; patt = pattern; psso = pass slipped st over; rem = remaining; rep = repeat; RS = right side; sl = slip; ss = slip stitch; st(s) = stitch(es); st-st = stocking stitch; tbl = through back loop; tog = together; tr = treble; WS = wrong side; yfwd = yarn forward.
Beading abbreviation
bead 1 = place a bead by bringing yarn to front (RS) of work and slipping bead up next to st just worked, slip next st purlwise from left needle to right needle and take yarn back to back (WS) of work, leaving bead sitting in front of slipped st on RS.
Beading note
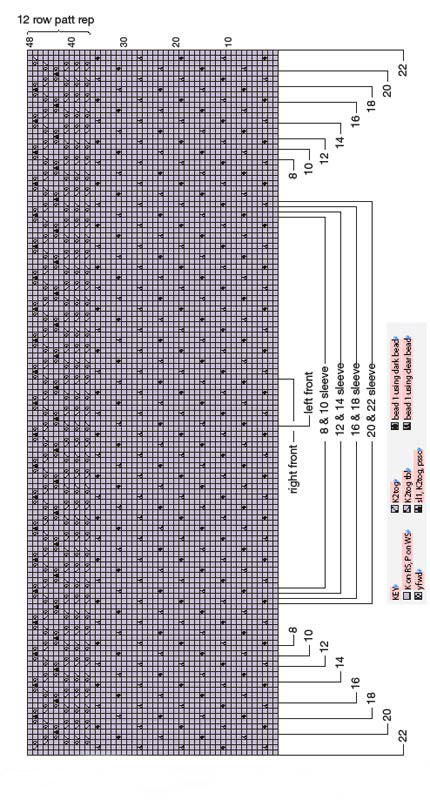
Before starting to knit, thread small faceted beads onto yarn. To do this, thread a fine sewing needle (one that will easily pass through the beads) with sewing thread. Knot ends of thread and then pass end of yarn through this loop. Thread a bead onto sewing thread and then gently slide it along and onto knitting yarn. Continue in this way until required number of beads are on yarn - thread beads onto yarn in alternate colours. Chart shows which colour bead to use. If next bead on yarn is incorrect colour, break yarn, remove incorrect colour bead and rejoin yarn. Do not place beads on edge sts of rows as this will interfere with sewing-up.
Back
Using 3¾mm needles and yarn A, cast on 93(97:101:107:115:121:127:135) sts. Beg and ending rows as indicated, working chart rows 1 to 36 once only and then repeating chart rows 37 to 48 throughout, cont in patt from chart as folls: Work 42(42:40:48:46:52:48:54) rows in total, ending with RS facing for next row. (Back should measure 14(14:13:16:15:17:16:18)cm.)
Shape armholes
Keeping patt correct, cast off 4(5:5:6:6:7:7:8) sts at beg of next 2 rows. 85(87:91:95:103:107:113:119) sts. Dec 1 st at each end of next 3(3:5:5:7:7:9:9) rows, then on foll 3(3:2:2:3:3:2:4) alt rows. 73(75:77:81:83:87:91:93) sts. Cont straight until armhole measures 18(18:19:19:20:20:21:21)cm, ending with RS facing for next row.
Shape back neck
Next row (RS) Patt 21(22:23:25:25:27:29:30) sts and turn, leaving rem sts on a holder. Work each side of neck separately. Cast off 4 sts at beg of next row, ending with RS facing for next row. 17(18:19:21:21:23:25:26) sts.
Shape shoulder
Cast off 6(7:7:8:8:9:10:11) sts at beg of next row, then 4 sts at beg of foll row. Cast off rem 7(7:8:9:9:10:11:11) sts. With RS facing, rejoin yarn to rem sts, cast off centre 31(31:31:31:33:33:33:33) sts, patt to end. Complete to match first side, reversing shapings.
Left front
Using 3¾mm needles and yarn A, cast on 51(53:55:58:62:65:68:72) sts. Beg and ending rows as indicated, cont in patt from chart as folls: Work 4 rows, ending with RS facing for next row.
Shape front slope
Keeping patt correct, dec 1 st at end of next row and foll 11(11:11:7:8:5:6:3) alt rows, then on every foll 4th row until 36(38:40:43:47:50:54:58) sts rem. Work 3(3:1:1:1:1:3:3) rows, ending with RS facing for next row. (Left front should now match back to beg of armhole shaping.)
Shape armhole
Keeping patt correct, cast off 4(5:5:6:6:7:7:8) sts at beg and dec 1(1:0:0:0:0:1:1) st at end of next row. 31(32:35:37:41:43:46:49) sts. Work 1 row. Dec 1 st at armhole edge of next 3(3:5:5:7:7:9:9) rows, then on foll 3(3:2:2:3:3:2:4) alt rows and at same time dec 1 st at front slope edge of 3rd(3rd:next:next:next:next:3rd:3rd) and every foll 4th row. 23(24:25:27:27:29:32:32) sts. Dec 1 st at front slope edge only of 2nd(2nd:4th:4th:4th:4th:2nd:2nd) and every foll 4th row until 13(14:15:17:17:19:21:22) sts rem. Cont straight until left front matches Back to beg of shoulder shaping, ending with RS facing for next row.
Shape shoulder
Cast off 6(7:7:8:8:9:10:11) sts at beg of next row. Work 1 row. Cast off rem 7(7:8:9:9:10:11:11) sts.
Right front
Using 3¾mm needles and yarn A cast on 51(53:55:58:62:65:68:72) sts. Beg and ending rows as indicated, cont in patt from chart as folls: Work 4 rows, ending with RS facing for next row.
Shape front slope
K eeping patt correct, dec 1 st at beg of next and foll 11(11:11:7:8:5:6:3) alt rows, then on every foll 4th row until 36(38:40:43:47:50:54:58) sts rem. Complete to match left front, reversing shapings.
Sleeves
Using 3¾mm needles and yarn A cast on 71(71:73:73:75:75:77:77) sts. Beg and ending rows as indicated, working chart rows 1 to 36 once only and then repeating chart rows 37 to 48 throughout, cont in patt from chart, shaping sides by dec 1 st at each end of 13th and every foll 10th row until 61(61:63:63:65:65:67:67) sts rem. Work 15 rows, ending with RS facing for next row. Inc 1 st at each end of next and every foll 6th(6th:6th:6th:6th:4th:4th:4th) row to 67(75:73:81:81:69:73:79) sts, then on every foll 8th(8th:8th:8th: 8th:6th:6th:6th) row until there are 77(79:81:83:85:87:89:91) sts, taking inc sts into patt. Cont straight until sleeve measures 44(44:45:45:46:46:45:45)cm, ending with RS facing for next row.
Shape top
Cast off 4(5:5:6:6:7:7:8) sts at beg of next 2 rows. 69(69:71:71:73:73:75:75) sts. Dec 1 st at each end of next 7 rows, then on every foll alt row to 31 sts, then on foll 7 rows, ending with RS facing for next row. 17 sts. Cast off 3 sts at beg of next 2 rows. Cast off rem 11 sts.
To make up
Press carefully according to ball band. Join shoulder seams. With centre of cast off edge of sleeve to shoulder, matching armhole edge decs to decs at top of sleeves, sew sleeve head into armhole easing to fit.
Hem edging
With RS facing, using 2.00mm crochet hook and yarn A, attach yarn to cast-on edge at left front opening edge, 1 ch (does NOT count as st), work 1 row of dc evenly along entire cast-on edge, working a multiple of 4 sts plus 1, turn. 1st row (WS) 1 ch (does NOT count as st), 1 dc into each dc to end, turn. 2nd row 1 ch (does NOT count as st), 1 dc into first dc, * miss 1 dc, 5 tr into next dc, miss 1 dc, 1 dc into next dc, rep from * to end. Do NOT fasten off.
Front edging
With RS facing, using 2.00mm crochet hook and yarn A, 1 ch (does NOT count as st), work 1 row of dc evenly up right front opening edge, across back neck and down left front opening edge to beg of last row of hem edging, turn. 1st row (RS) 1 ch (does NOT count as st), 1 dc into each dc to end, turn. 2nd row 1 ch (does NOT count as st), 1 dc into first dc, 7 ch (to form button loop), 1 dc into each dc to end. Fasten off.
Beg and ending at shoulder seams, thread lengths of yarn A through front edging and pull up to gather edge slightly. Fasten off securely. Attach one large bead to left front opening edge to correspond with button loop.
Crochet flowers (make 12)
Using 4.00mm crochet hook and one strand each of yarn A and B held together make 5 ch and join with a ss to form a ring. 1st round (RS) 3 ch (counts as first tr), 13 tr into ring, ss to top of 3 ch at beg of round. Fasten off. Using photograph as a guide, sew flowers in place along front opening edges, attaching one large and 4 small (2 of each colour) beads to each flower.
Taken from Rowan Knitting magazine No 40
The chart: you'll need to print this out and turn it on its side.
You might also like...
Search all of our knitting patterns here
See all of our free knitting patterns for shrugs, wraps and shawls


Post your comment
Join us here...


Click on a magazine title to see all its
online features and news

Stain buster
Our guide to removing smudges, spots, and other spills.
See more stain busting solutions >
Community
Forums
View all forums
Blogs
View all blogs-
 The five best things I tried this month
Posted by 11280Adrienne Wyper
-
 Learning Italian - è fantastico!
Posted by 11320Carol Muskoron
MORE FROM ALLABOUTYOU
View by magazine :
Contact | About Us | Privacy | Complaints | Terms & Conditions | Cookie Policy | Advertising | Site Map| Popular Forum Threads
© Hearst Magazines UK is the trading name of The National Magazine Company Ltd, 72 Broadwick Street, London, W1F 9EP. Registered in England 112955. All rights reserved.
All About You, Part of the Hearst UK fashion and beauty network © Copyright 2024