Knit and felt a little saddle bag: free pattern
Make this touchable textured knitted and felted bag, by Bev Beattie
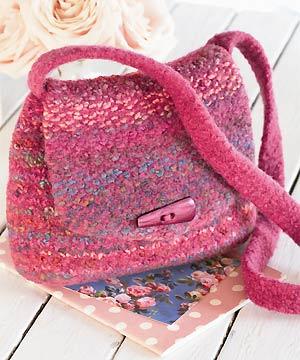
I found myself having to use crutches for a while and suddenly realised how hard it is to carry things while using crutches. I had always made my bags with shorter handles, but now I needed a bag that I could wear across my body, leaving my hands free.
I made this bag from a pure wool yarn and a random-dyed yarn that is 50 per cent super-wash wool and 50 per cent acrylic, which when felted gives a lovely bouclé effect.
I used moss stitch for the strap so that it stayed flat and was comfortable to wear. As my hands were occupied (by the crutches) I also needed extra security, so this bag has a flap with a button closure. The button was stitched on with the pure wool so that it felted into position, making it a strong fastening.
This style of bag can be made in any size: larger sizes are great for laptops and smaller sizes are ideal for carrying bottles of water - you can't carry mugs of tea when you are on crutches!
You will need
● 200g of Knitting4fun Pure Wool in Deep Pink (A)
● 200g of Lang Mille Colori in colour 65 (B)
● 8mm (80cm/32 in. long) circular needle
● 10mm (80cm/32 in. long) circular needle
● Pair of 8mm knitting needles
● Pair of 10mm knitting needles
● Knitter's sewing needle or bodkin for sewing
● Button or toggle for fastening
Finished size
Bag measures approx 19cm/71⁄2 in. high by 22cm/81⁄2 in. wide.
Tension
12 stitches and 14 rows to 10cm/4 in. over st st on 10mm needles using one strand each of A and B held together, although tension is not crucial in felting.
Abbreviations
M1 - make one stitch by picking up horizontal strand between stitches with tip of left-hand needle, using right-hand needle, knit into back of picked up strand
Bag
Using 8mm circular needle and one strand each of A and B held together, cast on 75 sts.
Join the cast on row into a circle, ensuring that the knitting is not twisted, and place a marker to establish the beginning of the round.
Round 1: [K1, p1] to last st, k1.
Round 2: [P1, k1] to last st, p1.
Rep rounds 1-2 twice more.
Round 7: [K14, inc] five times. (80 sts)
Change to 10mm circular needle and cont in knit stitch.
Knit 10 rounds.
Shape sides
Slip marker to the right-hand needle and start the shaping as folls:
Round 18: K4, M1, k32, M1, k8, M1, k32, M1, k4. (84 sts)
Knit 10 rounds.
Round 29: K5, M1, k32, M1, k10, M1, k32, M1, k5. (88 sts)
Knit 10 rounds.
Round 40: K6, M1, k32, M1, k12, M1, k32, M1, k6. (92 sts)
Knit 5 rounds.
Shape base
Slip marker to the right-hand needle and start the shaping as folls:
Round 66: K6, k2tog, k30, k2togtbl, k12, k2tog, k30, k2togtbl, k6. (88 sts)
Round 67: K5, k2tog, k30, k2togtbl, k10, k2tog, k30, k2togtbl, k5. (84 sts)
Round 68: K4, k2tog, k30, k2togtbl, k8, k2tog, k30, k2togtbl, k4. (80 sts)
Round 69: K3, k2tog, k30, k2togtbl, k6, k2tog, k30, k2togtbl, k3. (76 sts)
Round 70: K2, k2tog, k30, k2togtbl, k4, k2tog, k30, k2togtbl, k2. (72 sts)
Round 71: K1, k2tog, k30, k2togtbl, k2, k2tog, k30, k2togtbl, k1. (68 sts)
Round 72: K2tog, k30, k2togtbl, k2tog, k30, k2togtbl. (64 sts)
Join base
Turn the bag inside out and push 32 sts along to each needle point. Put both needle points together and, using another knitting needle (the same size as the circular needle or a size larger), knit tog the first st on each needle point. Knit tog the second st on each needle point, then slip the first st over the second st, so casting off (not too tightly) and joining the base of the bag at the same time. Rep until all sts are cast off.
Flap
Lay the bag flat with the cast-off seam running along the bottom. In line with the first increase made in round 18, place a pin in the top edge of the back of the bag. On the same edge, place a second pin in line with the second increase.
With the right side facing, one strand each of A and B held together and 8mm knitting needles, pick up 33 sts between the pins.
Row 1: [K1, p1] to last st, k1.
Row 2: As row 1.
Change to 10mm knitting needles.
Rep row 1 ten more times.
Row 13: Inc, [p1, k1] to last 2 sts, p1, inc. (35 sts)
Row 14: [P1, k1] to last st, p1.
Rep row 14 nine more times.
Row 24: Inc [k1, p1] to last 2 sts, k1, inc. (37 sts)
Row 25: [K1, p1] to last st, k1.
Rep row 25 nine more times.
Row 35: K2togtbl, [k1, p1] to last 2 sts, k2tog. (35 sts)
Keeping moss st patt correct, rep row 35 four more times. (27 sts)
Row 40 (1st buttonhole row): K2togtbl, moss 10, cast off 3 sts, moss to
last 2 sts, k2tog.
Row 41 (2nd buttonhole row): Moss 11, cast on 3 sts, moss 11. (25 sts)
Row 42: K2togtbl, moss to last 2 sts, k2tog. (23 sts)
Keeping moss st patt correct, rep row 42 three more times. (17 sts)
Cast off.
Handle
Using 8mm knitting needles and one strand of A, pick up 5 sts along the top edge of the bag at one side of the flap.
Row 1: K1, p1, k1, p1, k1.
Rep row 1 until handle measures 120cm/48 in. long.
Cast off.
To make up
Using the knitter's sewing needle and A, sew the free end of the handle to the opposite top edge of the bag.
Darn in all loose ends.
Following the instructions on pages 123-124, machine-wash the bag to felt it.
Sew the toggle to the front of the bag to align with the buttonhole in the flap.
I made this bag from a pure wool yarn and a random-dyed yarn that is 50 per cent superwash wool and 50 per cent acrylic, which when felted gives a lovely bouclé effect.
Now machine-wash the bag to felt it.
Felting the knitting
I use a front-loading washing machine for felting my knitted bags. Choose a full 40 degree programme, rather than a short programme, as this gives the agitation needed to felt the bag. This agitation is very important, as it is this as well as the temperature that felts the wool. Some washing machines may need to be set at a higher temperature to get perfect results. The 40 degree programme turns Knitting4fun yarns into a firm felt, which I like, but if you prefer a lighter felt, then you can experiment with shorter washes and different temperatures.
I do use laundry detergent and usually put the bag in an empty washing machine - rather than with other items such as towels, jeans or old trainers - as I think a bag felts better by itself. You can place the bag in an empty pillowcase to stop any fibres clogging up the filter, particularly when using mohair yarn. If you can open the filter easily it is best to clean it regularly so as not to clog it up and possibly cause damage to the washing machine.
Spin the bag dry then take it out of the washing machine as soon as possible. Do not allow the bag to sit in the machine for too long or creases may appear. If, after going through the wash programme, the bag has not felted enough, try putting it through again at the same temperature rather than at a higher temperature. If that does not work, then try a higher temperature. Once it is fully felted, the bag will shrink by about one-third in length and one-quarter in width. You must consider this shrinkage when designing your own bag patterns.
The bag will now need to be stretched into shape: I use tins or cartons to do this. You must shape the bag while it is damp as once it is dry it cannot be shaped withour dampening it once again. Place the tins in the damp bag so that the felt is taut and the bag is the desired shape. Leave the tins in the bag while it dries, placing it on the windowsill or a radiator. If the handles have shrunk a little too much, hang the bag from a radiator with the tins still inside so that the weight of them stretches the handles while they dry.
If the handles do not felt firmly enough, try holding the damp bag and hitting the handles aginst the wall outside the house. This seems ro shock the wool and firms it up.
You can also do this to the body of the bag if it has not felted enough. Just be aware of the neighbours or the postman, as they will think you are crazy, beating your handbag against the wall.
If the felted bag seems a little too fluffy, which it can do occasionally, depending on the yarns that have been used (mohair or alpaca are very hairy), I sometimes use hair clippers to shave the bag. I often do this outside so that the birds can have the fibres for their nests. This is when the neighbours and postman do decide that I am completely crazy, because it's not every day you see a woman shaving her handbag on the doorstep!
I have not felted my bags by hand personally, but have had friends do this. You can wash the bag in warm water in a big saucepan and agitate it by stirring and by repeatedly throwing it into the sink to shock the wool. Rinse it under the cold tap and then the hot tap and keep throwing it into the sink or bashing it against the draining board, beating or 'fulling' it until it is firmly felted.
You can sew on a large snap fastener or press stud to fasten the bag if desired.
The Pizzazz yarn comes in lots of different colours and I have knitted versions of this bag using most of them, as they are all so gorgeous.
This pattern is taken from 'Knit and Felt Bags' by Bev Beattie (A & C Black, £16.99). Click here to buy 'Knit and Felt Bags' for £13.59
You might also like...
Find more free online knitting patterns for women...


