

How to make piping
A smart fabric edging

A cord covered with a narrow strip of fabric, piping is sewn into a seam as a decorative edging, which also makes the seam stronger. Ready-made piping is available, but making your own enables you to use fabric to match your project.
Piping cord, which is soft, is available in various diameters, ranging from 3mm to jumbo, although the medium sizes are most commonly used. Cable cord, which is a firmer, twisted cord, can also be used and is available in sizes from 2mm to 1cm. If your cord is not pre-shrunk, wash and dry it at a high temperature.
The cord is normally covered with bias binding. However, if the piping is to be used on a straight seam and if you want the lines of the fabric pattern – such as checks or stripes – to run along the piping, you can cut the fabric strips along the straight grain. But if the piping will curve around corners, the strips must be cut on the bias to help them bend.
Scroll down for full instructions and diagrams.
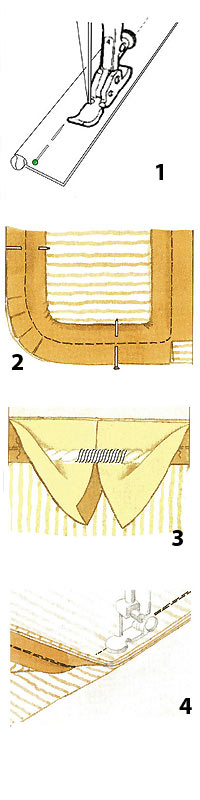
1. Place the cord on the wrong side of the fabric strip and bring the long edges of the strip together, enclosing the cord. Pin the edges together. Using a zipper foot on your sewing machine, machine-stitch down the length of the cord, close to it but without crowding the stitching against it or stretching the fabric.
2. Decide where on the project the piping will start and finish. It should ideally be an inconspicuous straight portion of the edge you are piping, rather than on a zip edge,
at a corner, or on a deep curve. Pin the piping to the right side of one fabric piece, with the cord facing inward and the stitching line of the piping along the seam line of the fabric piece. To make the piping turn the corner, clip into the piping seam allowances close to the stitching line and bend the piping around the corner. If the piping is to bend gradually around a curve, snip into the piping seam allowances at several regular intervals so that the cord curves around smoothly.
3. With the zipper foot on the sewing machine, machine-tack the piping in place, sewing on top of the piping stitching, and leaving 5cm unsewn at each end, which should overlap by 2cm. Unpick about 5cm of the piping machine-stitching at each end, and fold back the ends of the fabric strip. Trim the two ends of the cord so that they butt together, then bind the cord ends with thread. Turn under 1cm at one end of the fabric strip, and wrap it around the exposed cord, overlapping the raw end of the fabric strip. Machine-tack this portion of the piping in place.
4. With right sides together and raw edges even, pin this piped fabric piece to the other fabric piece. With the zipper foot on the machine, machine-stitch along the seam line very close to the cord, through all four layers. When the project is turned right side out, the seam will be neatly piped.
These instructions are taken from 'The Home-sewn Home' by Vanessa Arbuthnott with Gail Abbott (Cico Books, £16.99).
You might also like…
See all of our Vanessa Arbuthnott patterns
Sew a cushion with a piped edge: free pattern
See more sewing guides and advice here


