Register with us for competitions, online recipe book and chat


Knit a corgi: free knitting pattern
Add a royal pet to your household
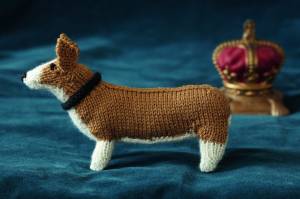
The Corgi is a foxy dog, with remarkably short legs and an instinct for herding. Corgis are athletic and use their agility to nip at the heels of sheep and horses. No one seems to know why the Corgi is associated with Wales but there are two types, Pembroke and Cardigan; ours is a Pembroke, identified by having almost no tail. They are much loved by the British Royal Family (16 dogs), although there have been stories of the Royal Corgis reverting to their old herding ways with some visitors.
Measurements
Length: 16cm (61⁄4in)
Height to top of head: 9cm (31⁄2in)
Materials
• Pair of 23⁄4mm (US 2) knitting needles
• 4 spare 23⁄4mm (US 2) knitting needles or small stitch holders or safety pins
• 10g (1⁄4oz) of Rowan Cashsoft 4ply in Cream 433 (cr)
• 15g (1⁄2oz) of Rowan Cashsoft 4ply in Walnut 441 (wa)
• Small amount of Rowan Pure Wool 4ply in Black 404 for collar and nose and eyes
Abbreviations
alt alternate
approx approximately
beg begin(ning)
cm centimetre
cont continue
dec decrease
foll follow(s)(ing)
g grams
icos including cast (bound) off stitch. (After casting (binding) off the stated number of stitches, one stitch remains on the right needle. This stitch is included in the number of the following group of stitches.)
in inches
inc work into front and back of next stitch to increase by one stitch
k knit
k2tog knit next two stitches together
k3tog knit next three stitches together
oz ounces
p purl
pult pick up loop below next st on left needle by inserting tip of right needle from back of work through loop – this stops a hole forming when turning work – then turn, leaving rem (number stated) sts on left needle unworked
p2tog purl next two stitches together
p3tog purl next three stitches together
rem remain(ing)
rep repeat
RS right side
st stitch
stst stocking (stockinette) stitch
tbl through back of loop
WS wrong side
[ ] work instructions within square brackets as directed
* work instructions after asterisk(s) as directed
Right Back Leg
With cr, cast on 9 sts.
Beg with a k row, work 2 rows stst.
Row 3: Inc, k1, k2tog, k1, k2tog, k1, inc. (9 sts)
Row 4: Purl.
Rep last 2 rows once more.*
Work 3 rows stst.**
Row 10: Join in wa, p4wa, p5cr.
Row 11: Inccr, k3cr, k4wa, incwa. (11 sts)
Row 12: P4wa, incwa, p1wa, inccr, p4cr. (13 sts)
Row 13: K5cr, incwa, k1wa, incwa, k5wa. (15 sts)
Row 14: P6wa, incwa, p1wa, incwa, p1wa, p5cr. (17 sts)
Row 15: Cast (bind) off 5 stscr, cast (bind) off 3 stswa, k to end wa (hold 9 sts on spare needle for Right Side of Body).
Left Back Leg
Work as for Right Back Leg to **.
Row 10: P5cr, join in wa, p4wa.
Row 11: Incwa, k4wa, k3cr, inccr. (11 sts)
Row 12: P4cr, inccr, p1wa, incwa, p4wa. (13 sts)
Row 13: K5wa, incwa, k1wa, incwa, k5cr. (15 sts)
Row 14: P5cr, p1wa, incwa, p1wa, incwa, p6wa. (17 sts)
Row 15: K9wa, cast (bind) off 3 stswa, cast (bind) off 5 stscr (hold 9 sts on spare needle for Left Side of Body).
Front Leg
(make 2)
Work as for Right Back Leg to *.
Row 7: Knit.
Row 8: Purl.
For right leg: Cast (bind) off 4 sts, k to end (hold 5 sts on spare needle for Right Side of Body). For left leg: K5, cast (bind) off 4 sts (hold 5 sts on spare needle for Left Side of Body).
Right Side of Body
Work in wa throughout.
Row 1: Cast on 1 st, with RS facing k5 from spare needle of Right Front Leg, cast on 10 sts. (16 sts)
Row 2: Purl.
Row 3: K16, cast on 8 sts. (24 sts)
Row 4: Purl.
Row 5: Inc, k23, with RS facing k9 from spare needle of Right Back Leg, cast on 2 sts. (36 sts)
Row 6: Purl.
Row 7: K35, inc. (37 sts)
Work 5 rows stst.
Row 13: Inc, k36. (38 sts)
Row 14: P2, p2tog, p34. (37 sts)
Row 15: K33, k2tog, k2. (36 sts)
Row 16: P2, p2tog, p32. (35 sts)
Row 17: K31, k2tog, k2. (34 sts)
Row 18: P2tog, using st on right needle as first st, cast (bind) off 23 sts, p to end (hold 10 sts on spare needle for right neck).
Left Side of Body
Work in wa throughout.
Row 1: Cast on 1 st, with WS facing p5 from spare needle of Left Front Leg, cast on 10 sts. (16 sts)
Row 2: Knit.
Row 3: P16, cast on 8 sts. (24 sts)
Row 4: Knit.
Row 5: Inc, p23, with WS facing p9 from spare needle of Left Back Leg, cast on 2 sts. (36 sts)
Row 6: Knit.
Row 7: P35, inc. (37 sts)
Work 5 rows stst.
Row 13: Inc, p36. (38 sts)
Row 14: K2, k2tog, k34. (37 sts)
Row 15: P33, p2tog, p2. (36 sts)
Row 16: K2, k2tog, k32. (35 sts)
Row 17: P31, p2tog, p2. (34 sts)
Row 18: K2tog, using st on right needle as first st, cast (bind) off 23 sts, k to end (hold 10 sts on spare needle for left neck).
Neck and Head
Row 1: With wa, and with RS facing k10 from spare needle of Right Side of Body then k10 from spare needle of Left Side of Body. (20 sts)
Row 2: Purl.
Row 3: K2tog, k16, k2tog. (18 sts)
Row 4: Purl.
Row 5: K4, k2tog, k6, k2tog, k4. (16 sts)
Row 6: Purl.
Row 7: K13, pult (pick up loop below next st on left needle by inserting tip of right needle from back through loop – this stops a hole forming when turning work – then turn, leaving rem 3 sts on left needle unworked).
Row 8: Working top of head on centre 10 sts only, p2tog (first st of p2tog is loop picked up at end of last row), p9, pult.
Row 9: K2tog, k9, pult.
Rep last 2 rows once more.
Row 12: P2tog, p9, pult.
Row 13: K2tog, k to end. (16 sts)
Work 3 rows stst.
Row 17: K2togwa, k5wa, join in cr, k2cr, k3wa, pult (leave 4 sts on left needle).
Row 18: P2togwa, p2wa, p2cr, p3wa, pult.
Row 19: K2togwa, k2wa, k2cr, k3wa, pult.
Rep last 2 rows once more.
Row 22: P2togwa, p2wa, p2cr, p3wa, pult.
Row 23: K2togwa, k2wa, k2cr, k5wa, k2togwa. (14 sts)
Row 24: P2tog wa, p2wa, p2togwa, p2cr, p2togwa, p2wa, p2togwa. (10 sts)
Row 25: K3wa, k4cr, k3wa.
Row 26: P3wa, p4cr, p3wa.
Row 27: K2togwa, k6cr, k2togwa. (8 sts)
Row 28: P1wa, p6cr, p1wa.
Work 3 rows stst cr.
Cast (bind) off in cr.
Tummy
With cr, cast on 6 sts.
Beg with a k row, work 2 rows stst.
Next row: K2tog, k2, k2tog. (4 sts)
Work 9 rows stst.
Next row: Inc, k2, inc. (6 sts)
Next row: Inc, p4, inc. (8 sts)
Work 26 rows stst.
Next row: K2tog, k4, k2tog. (6 sts)
Next row: P2tog, p2, p2tog. (4 sts)
Work 4 rows stst.
Next row: Inc, k2, inc. (6 sts)
Work 2 rows stst.
Next row: Inc, p4, inc. (8 sts)
Work 2 rows stst.
Next row: Inc, k6, inc. (10 sts)
Work 11 rows stst.
Next row: K2tog, k6, k2tog. (8 sts)
Work 3 rows stst.
Next row: K2tog, k4, k2tog. (6 sts)
Work 3 rows stst.
Next row: K2tog, k2, k2tog. (4 sts)
Work 5 rows stst.
Next row: K2tog twice. (2 sts)
Next row: K2tog and fasten off.
Ear
(make 2 the same)
With wa, cast on 6 sts.
Knit 6 rows.
Row 7: K2tog, k2, k2tog. (4 sts)
Knit 4 rows.
Row 12: K2tog twice. (2 sts)
Row 13: Knit.
Row 14: K2tog and fasten off.
Collar
With bl, cast on 24 sts.
Knit one row.
Cast (bind) off.
To Make Up
Sew in ends, leaving ends from cast on and cast (bound) off rows for sewing up.
Using mattress or whip stitch, sew up legs starting at paw. Stuff all four legs.
Using mattress or whip stitch, sew down centre back, around tail and down bottom. At head, fold in half and sew cast (bound) off edges of nose together.
Using mattress or whip stitch, sew cast on row of tummy to bottom end of dog and sew cast (bound) off row to nose. Ease and sew tummy to fit body, matching curves to legs. Leave a 2.5cm (1in) gap between front and back legs on one side. Turn right side out, stuff then sew up gap with mattress stitch.
Sew ears to head as shown in photograph. Using black yarn, embroider the nose using satin stitch and make two French knots for eyes.
Sew ends of collar together and slide over head onto neck.
Choosing Yarns
Alternative yarns can be used – different colours or thicknesses. If using thicker yarns, refer to the ball band for needle size but use a needle at least 2 sizes smaller than recommended as the tension (gauge) needs to be tight to hold the stuffing. The thicker the yarn, the larger the dog will be. We feel that finer yarns create a more refined dog.
Knitting the Body and Head
When holding stitches to use later on in a pattern, use a spare needle, a stitch holder or safety pin.
Holes can develop around the short row shaping at the top of the head. When sewing on the ears, use the sewing up end to patch up any holes. Swiss darning can also be used to cover up any untidy stitches.
Don’t worry if the neck of your dog is rather thickset, the collar is handy for giving the neck some shape. If needs be, reduce the number of stitches on the collar.
Stuffing the Dog
Stuffing the dog is as important as knitting it. You can completely change the dog’s personality by moulding the stuffing. Make sure stuffing goes right to the end of the nose and do not over-stuff the neck. If the stitches become distorted then you have over-stuffed your dog.
We recommend using 100% polyester or kapok stuffing, which is available from craft shops and online retailers. A dog takes 20–40g (3⁄4–11⁄2oz) of stuffing, depending on size.
Sewing and Stuffing Legs
When sewing up thin or loopy stitch legs or tails, use mattress or whip stitch and sew up on the right side of the dog: this means you won’t have to turn the leg/tail inside out. Sew on legs with seams facing backwards unless otherwise stated.
Use a knitting needle end or chopstick to push stuffing down to the paws. To smooth out the stuffing in the legs, roll the leg between your fingers.
If the legs are floppy once they have been sewn on, at about 2cm (3⁄4in) down from top edge of leg, sew through the body and legs to make the dog more stable. If the legs are too bendy, using a pipecleaner within the stuffing will steady them. Cut a pipecleaner to approximately 2.5cm (1in) longer than the leg, bend the ends over to fit the leg (otherwise they’ll poke through the knitting), roll the pipecleaner in some stuffing, wrap the leg around it and, starting at the paw, mattress or whip stitch the seam on the right side of the leg. By carefully bending the tips of the legs you can make paws.
These dogs aren’t toys, but if you intend to give them to small children do not use pipecleaners in the construction.
Adding Personality
The placing of the ears, eyes and nose needs to be carefully considered. We recommend pinning on the ears to find the perfect position before sewing. For the eyes, experiment with both the size and the placing of the French knots until you are happy with your dog’s expression. For the nose, refer to the photograph and work in satin stitch.
Colour Knitting
There are two main techniques for working with more than one colour in the same row of knitting – the intarsia technique and the stranding (or Fair Isle) technique.
Intarsia Technique
This method is used when knitting individual, large blocks of colour. It is best to use a small ball (or long length) for each area of colour, otherwise the yarns will easily become tangled. When changing to a new colour, twist the yarns on the wrong side of the work to prevent holes forming.
When starting a new row, turn the knitting so that the yarns that are hanging from it untwist as much as possible. If you have several colours you may occasionally have to re-organize the yarns at the back of the knitting. Your work may look messy but once the ends are all sewn in it will look fine.
Stranding or Fair Isle Technique
If there are no more than 4 stitches between colours you can use the Fair Isle technique. Begin knitting with the first colour, then drop this when you introduce the second colour. When you come to the first colour again, take it under the second colour to twist the yarns. When you come to the second colour again, take it over the first colour. The secret is not to pull the strands on the wrong side of the work too tightly or the work will pucker.
I-cord
With double-pointed needles *knit a row. Slide the stitches to the other end of the needle. Do not turn the knitting. Rep from *, pulling the yarn tight on the first st so that the knitting forms a tube.
 This pattern is taken from 'Best in Show' by Sally Osborne and Joanna Muir (Collins & Brown, £12.99).
You might also like...
Click here for more toys to knit, sew and crochet
Fly the flag with our patriotic craft projects (including free bunting to print out)
Search all of our knitting patterns here
Love dogs? See all of our pet ideas here
Knit a corgi, the favourite royal dog: free knitting pattern


Post your comment
Join us here...


Click on a magazine title to see all its
online features and news

Stain buster
Our guide to removing smudges, spots, and other spills.
See more stain busting solutions >
Community
Forums
View all forums
Blogs
View all blogs-
 The five best things I tried this month
Posted by 11280Adrienne Wyper
-
 Learning Italian - è fantastico!
Posted by 11320Carol Muskoron
MORE FROM ALLABOUTYOU
View by magazine :
Contact | About Us | Privacy | Complaints | Terms & Conditions | Cookie Policy | Advertising | Site Map| Popular Forum Threads
© Hearst Magazines UK is the trading name of The National Magazine Company Ltd, 72 Broadwick Street, London, W1F 9EP. Registered in England 112955. All rights reserved.
All About You, Part of the Hearst UK fashion and beauty network © Copyright 2024