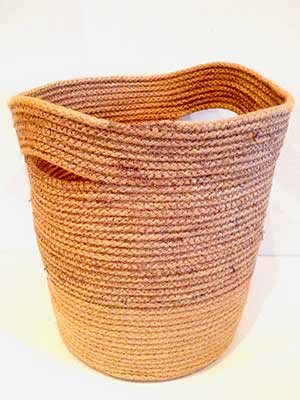
Make a stylish rope storage basket
Stash stuff neatly away with this stylish rope storage basket to make. By Suzanna Drew-Edwards

This makes a basket 26cm high with a 17cm base
You need:
● Hemp rope – 6mm diameter and approx 20-25 metres in length. Before you buy this thickness of rope, make sure it will go under the presser foot of your sewing machine
● Thread – we used a matching thread, but you could use a contrasting colour. You’ll need 2–3 spools
● A sewing machine that can do zigzag stitch
● Spare machine needles – preferably a denim weight (we broke three needles making this!)
 Starting the bottom of your basket
Image 1: Set your machine so it will do a big zigzag stitch.
Start by coiling the end of the rope for a couple of turns. Place this under the presser foot on your machine and start stitching the layers of rope together with zigzag, making sure it catches each side of the rope in on each stitch.
You may have to go backwards and forwards a little bit just to make sure it’s all caught in place, but gradually as the coil is caught in, you’ll be able to start stitching round and round following the line of the rope.
Image 2: Keep on going until your base is as big as you want it to be.
Image 3: We stopped when it became too awkward to turn on the machine.
Starting the sides
Image 4: If you have your basket on the right-hand side of the presser foot (like ours in image 1 and 2), switch your work around so it’s on the left hand side of the presser foot.
We had to turn the base over so that we were working the right way but it was worth it as we had more room.
Now, in order to make your sides you have to stitch the rope on at a slight angle to the basket base so that it starts going upwards. Keep the piece of ‘working’ rope slightly tighter than previously. It may feel like it’s not working at first, but persevere.
Image 5: Keep stitching on the rope and going up the sides – until you’re happy with the basket height (or you have around 2 metres of rope left).
Adding handles (optional)
Images 6 and 7: When you have approximately 2 metres of rope left, start your handles.
Make a gap or loop up the rope slightly so it forms a hole in the sides of the basket. Don’t stitch this bit. Then approximately 10cm on, join the rope back onto the main body of the basket again.
Repeat on the opposite side (if you want two handles).
Continue stitching round as normal so that the rope forms a solid handle.
Finishing off
Image 8: When you have approximately 30cm of rope left, trim the end diagonally.
Image 9: Continue stitching to the very end, and press the diagonal cut into the body of the basket so the end of the rope slopes into the basket gradually – if you don’t do this, it will look very obvious where the rope finished.
You might also like...
Sew a laundry basket liner
Create stylish storage for your home
See all of our free sewing patterns


