Make a wall-mounted dog's head decoration
Bring some puppy love into your living room. By Suzanna Drew-Edwards

This makes a head measuring 27cm from the top to the lowest point of the neck. It sticks out from the wall by 31cm (excluding the wood mount).
You will need
● Felt or fake fur for the main head - 70cm x width of fabric
● A piece of felt for the back of the dog’s head – 30cm x 30cm (or use offcuts from the main fabric)
● A small piece of black felt or leather for the nose
● Buttons for eyes – we used 2 cream buttons and 2 smaller black buttons
● Some dark brown sheep's wool for the eyebrows (optional)
● Ribbon for the hook at the back
● Polyester stuffing (we used the inside of a synthetic pillow)
● A block of wood for mounting - optional (or hang directly on hook on the wall)
Cutting out
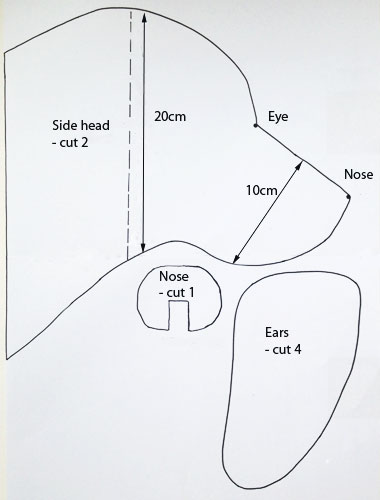
Print out the pattern templates and cut...
● 1 x head gusset
● 2 x side heads
● 1 x nose
● 4 x ears
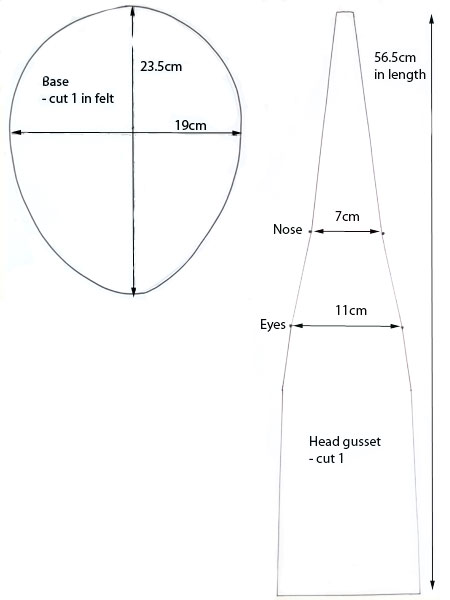
● 1 x base of neck (we did ours in felt to lie flat against the mount)

Attaching the gusset to the sides
On the gusset piece, mark with pins the position for the nose and the eye line as shown on pattern (image 1).
Matching these marker points – pin the gusset to one side of the head (image 2). Stitch into place 0.5cm from the raw edge, backstitching at the beginning and end to secure. Repeat with the other side of the head, making sure you match the marker points (otherwise you get a lopsided head).
With right sides together, pin the rest of the neck (from the end of the gusset) – and stitch together (image 3). Don't stitch the base of the head – you need this to remain open.
Stitching the ears
Take two ear pieces and, with right sides together, pin and stitch most of the way round – but leave an opening so that you can turn the ear the right way round (image 4).
Repeat with the other ear and when you’ve turned them the right way round, hand stitch the opening so it’s securely closed.
Stitching the nose
Fold the nose in half and stitch around the ‘U’ shape (image 5). This gives a slightly protruding nose so that when you attach it, you can insert a little bit of stuffing so it sticks out a little bit.
Attaching the base of the head
Take your felt base and at each end find the half way mark. Mark these with a pin for the centre top and centre bottom (image 6).
Now take your main head piece and match the centre bottom with the seam at the bottom of the neck and match the centre top with the centre top of the head (image 7). Pin all the way round each side easing into place.
Stitch 1cm away from the raw edge but make sure you leave a hand-sized opening in your stitching – you will sew this up after the head has been stuffed.
Stuffing
Turn the head the right way round. It should be looking like a dog by now!
Grab handfuls of stuffing and push it into your opening (image 8). If you forgot to leave an opening, just unpick a section of the seam.
Push the stuffing right down into the nose and work your way up the head filling it tightly as you go. We filled it quite densely around the brow area so that it had a good firm feel to it. Keep checking the head from face on to make sure the stuffing isn’t lopsided.
When it’s filled and you’re happy with the look, handstitch the opening so it’s securely fastened.
If may look more like a horse or a deer at the moment but once you’ve attached the ears, eyes and nose, it’ll look like something that barks!
The final details
Pin the ears into place and handstitch securely.
Take the black nose piece and with matching thread, sew onto the tip of the main head (image 9). Just before you finish sewing the nose, insert a little bit of stuffing inside the nose and finish stitching.
Place your black buttons on top of the white buttons and stitch together. Then handstitch into place onto the dog’s face to make its eyes.
Position some sheep's wool over the eyes and sew into place for big bushy eyebrows.
To attach a hook, take the little piece of ribbon and stitch it onto the top back of the head (image 10).
Give him a name, tie a ribbon round his neck and enjoy the new addition to your family.
You might also like...
Make a doggie beanbag
Sew a Liberty print dog lead
More craft ideas to make for your pets